Thursday 31 January 2019

Small finished top

I am still in the cleaning and clearing out mode.  Trying to keep my quilting room in order.  Though at times it gets to be a disaster while I am working on something or many things at once.  Yesturday was no different.  

I have one quilt block on the design wall, the wild and goosey block, and all of a sudden inspiration hits me.  I've been stalled on these 3" finished blocks, because they were just not doing it for me.  So, out came a mess of fabric to construct this churn dash block. I've decided to add in an alternate block, with bigger pieces, to tone down the business.  


I think it will work.  Though by doing this I have in fact just created a different quilt that uses up less wild & goosey blocks, leaving me with extra, to make another NICU quilt.  So, instead of decreasing the number of quilts to make, I have yet again increased them...lol.  I seem to be going the wrong way.

Anyways, so this leaves the extra pieces on the cutting board already laid out ready to be assembled with some sashings and cornerstones.  I still have my modern version of the 3-way BOM on my sewing table waiting for the last border and my six point stars sitting on the ledge behind me vying for my attention too.  

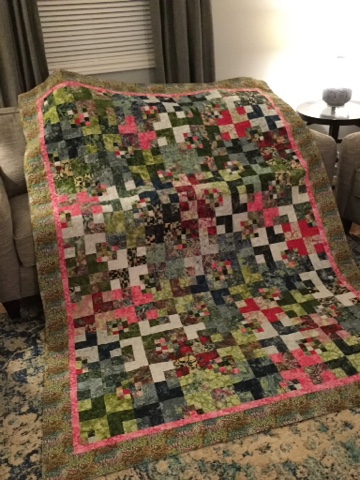
If that was not enough, out of the corner of my eye, I catch sight of this next NICU quilt number 5 of 20, or should I now say 5 of 21, with that resent addition...lol. The centre four log cabin blocks were donated to me, to do as I wish.  I decided to use them as they were and just attach them to each other on the dark side to create the centre plus sign.  

As this was an easy finish, it overruled everything else.  I needed to clear something out of here.  The blocks were together from another sewing session.  All that was left was to put the three borders on, to bring this NICU quilt to 24" square.  All done.
  

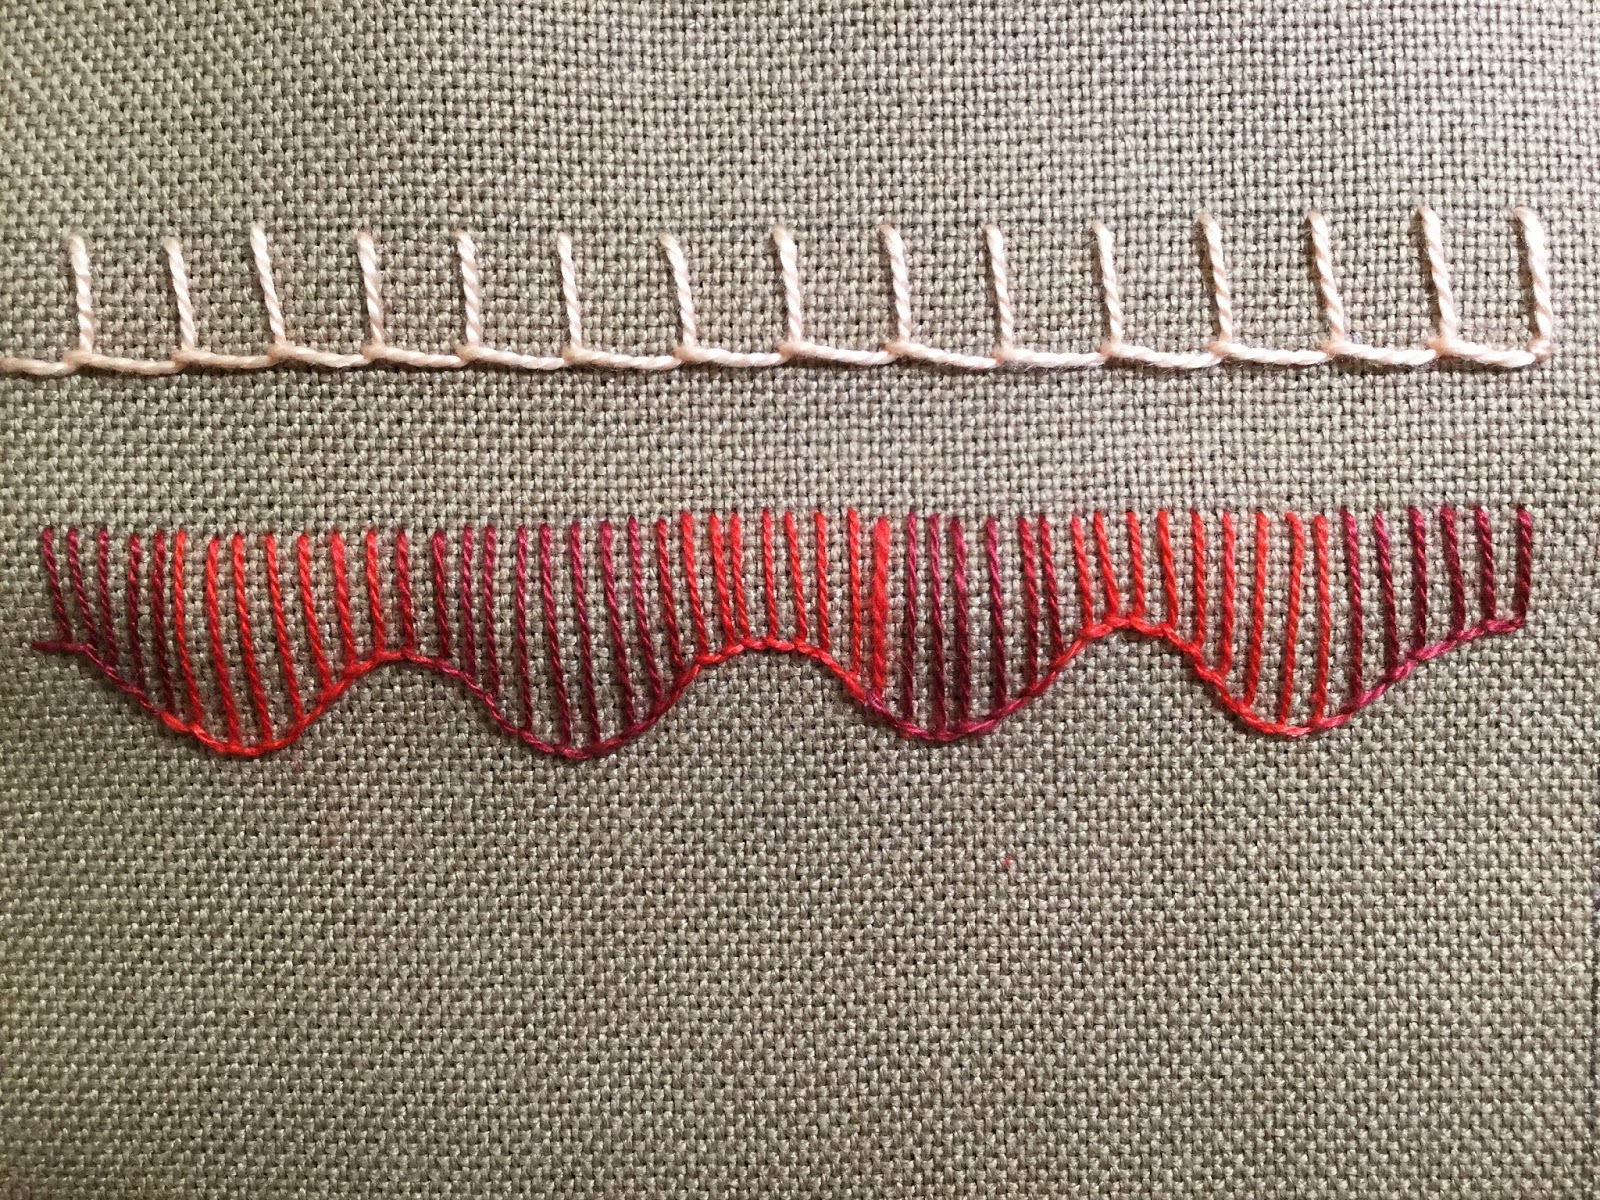
January is coming to a close at the end of the day today.  Yikes!  I have only one row left, plus a word to complete my label for this month.  I am in the process of going back to all the quilts I've made, that I still own or still have not distributed, to make a label for them.  Last year I did many.  Many are still here and others have been donated or given away as gifts.  At this point I now have 11 more labels left to make.  So, the way I figured it, if I get one label a month, plus keep up with the labels for the current finishes, I will be done and up to date with all my labels, by year end.


I know it is a stretch with everything else I plan, but if I don't set the goals they definitely will not get done. This way, there is a chance of getting it done.  At the beginning of the month I only had the first two rows done, so I have completed a fair amount already.  The thing is, that each row takes at least an hour to complete.  The stitches are so tiny, in order to get the curves and all, that I have to make a conscious effort to sit and sew them.  It helps if I play reruns on Netflix while doing it.  Guess what I will be doing this evening!

Enjoy the last cold day of January!

Wednesday 30 January 2019

Camping quilt

I have this friend at the longarm guild group that I go to, that had a couple of panels.  She was wanting to make a special quilt for her son.  Her son is really into camping and the two panels she had were smaller pictures of camping scenes and the second one was of hunting.

This friend had finally found a pattern that she wanted to use these pictures in, however the finished blocks of the pattern were, I believe, 16" finished, which would have been way too big for her pictures.  There were two sizes of pictures and the small one was only 5" square.  It would have been lost in the background.


So I suggested she resize her blocks, to a better size, to suit the pictures.  That is when she looked at me with her eyes practically crossed...lol.  I realized that she did not have the "mad drafting skill", as they put it, for those that can just look at a design and rework it.  She was surprised that it could even be done.  So, I offered to do it for her.  The designing part is one of my favourite parts of quilting.

She did a great job assembling her quilt and the colours look great.  When she went shopping for her fabrics, she came across this brown, which is a wood grain motif.  It works very well with the overall nature scene going on in the pictures.


Here is a closeup.  Looks great!  It's all quilted and ready to be gifted some time in May.  I am sure her son will love it!

Tuesday 29 January 2019

Buckhorn area Quilting at the Lake quilt show (QW)

I went to the Buckhorn quilt show back on September 9th, last year.  I took a bunch of pictures of various things.  There were some really pretty quilts.  The four that I am going to post here today are just for my record, so I don't lose the pictures in the vast folder of pictures.  Here I can word search it to find them.  They are in no particular order, only how I found the pictures in my folder.  

This first one is an old pattern.  You don't see this one around much.  It's a good pattern for using up colourful scraps.  This block is made up of a Baptist fan on the one half, with the half moon handle a solid colour and a different solid colour to fill in the corner on the opposite side.  As you twist and turn the blocks the solid colours make the candy part of the candy wrapper and the colourful Baptist fan does the edges of the wrapper.  This would make a pretty baby girl quilt.


This next one I fell in love with.  I love the colour and the intricate pattern.  Can you see those flying geese in a half circle formation.  Wow!  Everything about this quilt hit me.  There isn't a single thing I would want to change on it.  Kudos to the person who made it.  Unfortunately, I lost my page with the information about this quilt.  If anyone knows the name of the pattern, I would appreciate knowing it.


This one I took many different versions of.  I posted this picture because it was the one that you could see more of what was going on in the quilt.  Some of the other versions were softer on colour or more floral and I think one of them was only blues.  The Buckhorn guild members had a sub group, that got together and many of them worked on their own quilts together.  I wouldn't mind finding out the name of this pattern too.  The hand stitched blocks were cute.  You could make the different blocks and rearrange them to suit your own style.


This last picture I kept for the quilting aspect, though the hand stitched design of the quilt was gorgeous, I was wanting to remember this form of quilted feathers.  They were unique as they were made with a hook to form the first part of the feather, but instead of backtracking to move on to the next feather the maker did two humps that make it look more like a heart, before coming back down to finish the one feather leaf.  I thought it was very interesting and it adds more of a feminine feel to the feathers.


Even though this post is really only for my own record, hope you still enjoyed it.  At a later date, maybe I will go back and chose some other pictures from the show to share with you.

Enjoy you day.  Stay in and stay warm.

Monday 28 January 2019

Layout and quilting ideas for the 6-point star quilt

We're fast approaching the end of the month.  ALREADY!!  I seem to be repeating myself, but where has the time gone!  Just a blink of an eye and January is over.

This is my progress so far on my January's challenge quilt of the month, as part of the AP&Q UFO challenge.  I am happy I got many quilt blocks done.  The more I do the brighter it gets.  There are eighteen full blocks completed and four half blocks.  The brightness is growing on me.


This is the layout for the blocks.  It's pretty simple.  I made the diagram more so to calculate the final size of the quilt.  When the rows stager, it's easy to miscalculate the size or how many blocks you need, especially horizontal with those points.


One morning a while back, I sat having my tea, enjoying some quiet time.  During these times, I often doodle.  I had enlarged a section of the quilt, in EQ.  I wanted a diagram of the outline of the block pieces.  The thoughts were in my head to design a quilt pattern for each block, as though they were individual stars.  Each one different than the other, but all linked together by a running chain of arches.


You can see the chain of arches better on the picture, at the bottom lefthand corner.  If you enlarge the picture, you can see all the different star designs.  Just like they say for snowflakes, "no two are alike", up until this point anyways.

Well......by the time I managed to fill this section, it was getting harder and harder to come up with more different ideas, that didn't look like one I've already done.  Can you imaging trying to do that for the whole quilt, with many more blocks than what you see here. Yikes!  I will have to give it some more thought and some time to brew.  I am sure the options are endless, but at that moment, that was all I was able to come up with.

So........this month's quilt may need to be put away for a while and sit uncomplete for a while longer, but I am still so happy for the progress that I did do.  The task doesn't seem so daunting anymore.

Until next time, have a great day!

Sunday 27 January 2019

Gathering flowers quilt third two blocks

I haven't been able to get in any quilting time these last couple of days.  I'm not complaining, because family time is important.  Friday evening my son and I, with our four legged little girl Maddie, took a drive up to visit my mom.  We all had dinner and spent some time just chilling out.  Saturday, my husband and I, with the help of both our son and daughter, worked on getting the entertainment components working.  

We're all set up and already enjoying the new set up.  We now have everything in the one space and with the removal of a large armoire, we now have space to do the workout videos/DVDs.  I can see it now.....we're all going to be fighting for our turn...lol.  Thinking now it may not have been a good idea.  Lol just kidding!  We all kind of have our routines and they don't seem to conflict with each other, other than this may get my kids out of there rooms a bit more, to watch Netflix on the big tv scene instead of their tablets.

Today I have deadlines to deal with.  First up is finishing a wall hanging for one of my customers.  I need to prepare all my supplies for the guild meeting tomorrow.  I am hosting one of the round robins, where I will be talking to the members about how to prepare the quilt for quilting (ie different battings, backings, etc.).  Lastly, I have to work on the handouts for the round robin.  That will keep me busy for most of the day.

As I won't be able to share anything that I will be working on today, I thought I would share another couple of appliqué blocks I was preparing during my Christmas break.  The next two blocks are wreaths.  Very similar however one has alternating rose flower buds and the other has berries.

Both of the wreaths are called Cherry wreath from page 75 of Mini Dietrich's Baltimore Basics book.  This first one is the rose bud version.  I already have the stem completed and now I have the leaves and buds cut out and ready to sew.


This next one is with the berries instead, however I just realized I made a mistake, and I need to change the one singular rose bud out for a cherry.  I followed the picture and forgot that the rose bud was there only to show a second version.  Oh, well.....that will be a simple swap out.  I can keep the rose bud for another block.  The block also has the stem completed.


I really can't wait to get working on some of these blocks.  The process of preparing them has rejuvenate my interest in completing this quilt.  It's on my list if twelve UFOs for the AP&Q UFO challenge, so I only have to wait for the number to be drawn.  The Gathering Flowers quilt is my number four.  Wonder which month that number will be drawn......I'll just have to wait and see.

Enjoy the rest of your weekend!

Freehand version of the 3-way BOM quilt

We are now 10 minutes to midnight, Saturday evening and though I have been busy all day, I have not been able to get the few things that I need to get done by Monday done.  Guess what I will be doing tomorrow.

It's late I am tired and ready to turn in, so this will be a short post.  Thursday evening I finished this quilt top.  This is my version of the freehand 3-way BOM quilt.


The blue and green fabric with butterflies stands out a bit more than I thought it would, but I am thinking maybe once I quilt it, it may tone down.  Otherwise, I am sure a young child would prefer the brightness of it, so there is that.

Now I have the modern version left to do.  I have the first border cut out and ready to sew, but that won't be for a bit.  

Today, or should I say yesturday, as we just passed midnight, it took me most of the day to put up the wall mounted tv in the basement.  It really was more than just the tv.  It was the whole system, from the DVD/VHS player, the blue ray/surround sound, the wii, the wireless connection for playing off your phone/IPod and the headphones.  Like I said, it took most of the day.

Once that was done I had to take the large, heavy wall unit up out of the basement, clear out all the excess stuff that has accumulated over time, wash things down and vacuum.  I am beat.  I am off for a shower and bed.  Tomorrow will is another day and with deadlines looming over my head, I'd best start the day early.

Thursday 24 January 2019

Primary easy street block

These next two NICU quilts are 3&4 of 20.  The blocks are the primary block, for Bonnie Hunter's Easy Street mystery quilt, that my daughter made a while ago.  I've gathered up all the orphaned blocks and pieces and I'm on a rampage to use them all up in NICU quilts.


These two were the same block, so I made them similar.  Only changed the last purple border.  

Oh, by the way, did you catch it....another twisted block....lol.  I guess I should have learned from the first one I did yesturday, to take a few minutes to check for errors.  That will teach me...lol.  I've already fixed that twisted block too, so both of these tops are also ready to be quilted.


Now I am working to try to finish the two borders for the remaining two 3-way BOM quilts.  I started putting the grey border on the freehand version of the quilt.  Two more to go.  I will work on the modern version.  Things are definitely coming along.

The one thing that has been at a standstill though, is this month's AP&Q UFO Challenge quilt.  I am hoping that getting these few quick finishes in, will motivate me to relax and sit to do up some more six point stars.  I was initially hoping to at least finish the blocks themselves, but at this rate, I think that idea is just wishful thinking.  We shall see......

Wednesday 23 January 2019

Alternate Easy Street block

I finished another small NICU quilt top this evening.  This one came about from a leftover, alternate block, from my daughter's version of Bonnie Hunter's Easy Street mystery quilt.

I added the additional pieces around the perimeter of the block, to enlarge the quilt and to use up the rest of the miscellaneous pieces.  I was doing good.  It took me no time at all to get this together, even with all the small pieces of the outer border.


Can you see the problem...........one of these corners is not like the other....lol.  The reason this was one of my daughter's rejected blocks is because she got one of the squares turned the wrong way, so instead of fix it, she just put it aside.  In the end she didn't need it, due to her changing the layout, from the original designed by Bonnie.  I didn't even catch the error, until I had the whole thing pieces and the final border on.

How frustrating.......... Oh, well.  There was no helping it.  I had to fix it.  It is just not in me to leave it like that.  So today after work, I took the time to gently remove the one block, while keeping the rest as is.  I turned it and sewed each side carefully, not to catch fabric from the other blocks.  Ironed it up, and voila. Done!  

However, you'll have to wait for the revised, fixed version when I quilt it.   I have a customer quilt to get done this weekend, install the wall mounted tv and set up the entertainment area.  Maybe after that, if there is time, I can get all three NICU quilts quilted.

Stay tuned for the reveal of the other two, tomorrow.

Tuesday 22 January 2019

Finished quilting a NICU blue rail fence quilt

I have a small finish for January, so far.  This is 1 of 20 NICU quilts, that are being made up from miscellaneous blocks and pieces.  Mostly from extra blocks from other finished quilts, from customers, friends, family and myself.  This one is a rail fence block set in the traditional basket weave layout.  The blocks were already assembled, so all I had to do was put the blocks together.


I found this piece of tie dye fabric in my stash.  It has the same tone of blues that are on the front, but it also has some splashes of colour to brighten it up.


In my attempt to brighten up the quilt a bit further, I quilted this piece with the Becker's Star pantograph, using a bright mango yellow thread.  The design may be a bit difficult to see in the picture, due to the busy fabrics, but in person it stands out more.


Today after work a took half an hour before starting dinner to organize the next few NICU quilts I want to do.  Those are all curtesy of my daughter.  They come from the extra blocks of her Easy Street quilt.  I'll post more about them as I finish them.  

Monday 21 January 2019

Mom's indigo swirl quilt

Saturday and Sunday were very busy for me with renovations.  I am so grateful for how far they've come with technology, when it comes to paint.  Paint now a days dries for recoat in 1-2 hrs depending.  I was able to finish the plastering late afternoon on Saturday, prime the ceilings and walls, paint the ceiling two coats plus the walls, in my downstairs hallway and my sewing room.  I would never have been able to get that much done in one day before.

Sunday it took me most of the morning and part of the afternoon to put my sewing room back together.  After that I painted the downstairs hallway the last coat and decided to freshen up the paint in the kitchen too, as the hallway and kitchen are joint by some walls.  Wow!  Three rooms in one weekend and all cleaned up again, before heading to bed that night.  All because I didn't have to wait the usual 4 hour drying time.

Anyways, now on to the quilting part of this post.  As I did all the painting this weekend, there was no quilting for me, so I found one of my older post that I haven't posted yet.

This is my Mom's quilt.  She got the pattern from a quilting magazine.  She fell in love with this quilt the minute she saw it and had to make it.  

  
The quilt picture was taken at her place, on the couch in the livingroom where it will be.  It matches very well with her carpet....lol.  We took the inspiration from a pillow that matches her armchair.  I took this picture at her house, because I forgot to take the finished quilt while I had it.


She gave me the quilt to quilt for her and I finished it back in the beginning of August. It took me a while to get the final picture.  Above is a close up of her quilt.  You can see the colours better.  Mainly in blues, a few kaki and beige for the background.


Here is a close up of the quilting, just off the longarm.  I love the romance of the curves to these block and how one block leads right into the other.  Mom had to put this on her design wall in order to keep the colours straight, as each block has a colour fabric from it's neighbour.  

It's beautiful!  I may make one for myself in another colour way.  But.....curves....I seem to remember how long it took me to finish my drunkard's path quilt, all because it had curves.  We'll see.  Maybe, maybe not.

Sunday 20 January 2019

The traditional version of the 3-way BOM top is complete

I realized I forgot to post this one, when I was writing up the last post about finishing the last two blocks for the freehand version of the 3-way BOM.  I not only finished these blocks back in November, but I also finished assembling the complete top.

Here is the first block.  Of all the blocks, this is probably my least favourite.  I wonder how this block will be quilted.  The quilting may completely change the look of the block.


Here is the second block,  the last of twelve blocks.  I like the large open space of the corner triangles.  I can't wait to see what will be quilted in that section.


Finally we have the completed top.  If you recall from the beginning, when I started this venture, back in January, I decided I was going to do all three versions of this quilt.  I wanted to learn all the different quilting designs being taught, for all three versions.  

My stipulation/restriction, was that the only way that I could justify doing all three, was that I had to use my stash.  No buying any fabric for these.  I didn't want to put any more cost into this longarm quilting class.  I did find all the fabric for all three versions, for the blocks.


When it came to the sashing and borders.....well.....I hadn't thought that far in advance.  I still didn't want to buy fabric for the sashings or the borders.  That is why the border is a bit unusual.  I only had these two fabrics that would coordinate with the quilt top.  The thing was though, I didn't have a big enough piece to use the darker red, which was my first chose.  So in the end I decided to piece the border.  Even doing that, I barely had enough.  Probably because I needed a bit more fabric, when I decided to do the diagonal seams, to slip in the rose colour fabrics.

The insertion of the diagonal piece tends to make the border look a bit more modern than traditional, but.....oh well, done is better than not.

Now I am going to practice some of the new to me, quilting designs and get this sampler quilt done.  The quilt will be a donation to Project Linus when I am done.

Saturday 19 January 2019

Freehand version of the 3-way BOM quilt

Yesturday, throughout the day, during my breaks and lunch, I finished assembling the last two blocks of the freehand version of the 3-way BOM quilt.  They didn't take long, because I had already made the same blocks for the traditional version.  Which reminds me, I don't think I showed the completed top for the traditional version.  I'll have to look for those pictures to post about it.


These are the two last blocks.  I like when there are pieces large enough to display a butterfly, like in the block below.  As it so happened, I did not have to fussy cut this one.  I just lucked out when I cut a piece of the edge off the fabric.  These colours are so close in shade, that sometimes you can't tell where one starts and the other one ends.  I think I prefer having more of a distinction.


It was going so well, that at the end of my shift, I decided to go ahead and put the rows together with the sashing.  Yay!!!  The centre of my top is done.  To complete this quilt top, I will use the grey sashing fabric to make the first border and follow that up with the butterfly fabric.


I'm almost done this one.  Soon I will be able to practice live, the freehand quilting with the freehand version, versus just drawing them out.  I know that drawing them out is important, as it creates muscle memory, but I am just itching to do it for real.

Today will be mainly plastering, sanding, plastering, and sanding some more.  I am hoping to prime by the end of the day and maybe even a coat of paint.  If I get really close, I will stay up late into the night/morning, just so that I can finally get my quilting room back in order.

Wish me luck!

Friday 18 January 2019

Take a Stitch Tuesday (TAST) week 3 for 2019

Take a stitch Tuesday for me is late this week, but I am getting caught up before the next stitch is revealed.  That's something.  This week is another common and versatile stitch. I made a few different versions for this one.

Here is the link for week three of TAST and Beyond TAST:  https://pintangle.com/2019/01/15/tast-week-3/

The stitch for week 3 of TAST is the Buttonhole Stitch https://pintangle.com/2012/01/09/take-a-stitch-tuesday-week-2-2/, my version is the first row with peach/pink stitches in the picture below.  I did the traditional version.  There are many uses for the buttonhole stitch, but most commonly you would see them along the edges of an appliqué or the edge of a blanket.  


Just below the peach/pink traditional buttonhole stitch, I tried a fancier version.  Sharon shares many different ways to use this stitch.  Go check it out on her site.  Myself I decided to do the one where the stitches are tighter together and the bottom edge forms a scalloped edge.  That is the one I did above using the variegated red thread.

I was having so much fun that I decided to do another variation from Sharon's selection.  This next one, the one using brown thread, is in fact two separate rows placed back to back.  I can see this done with beads between or on the tips of the short and long stitches.  It looks good, but I just noticed that I will need to work on how to get both sides to match up.  There were many other variations, so don't forget to check them out.


The stitch for week 3 of Beyond TAST is the Reverse Buttonhole Bar https://pintangle.com/2013/12/17/take-a-stitch-tuesday-94-reversed-buttonhole-bar/, my first version below, is purple with the additional part done in pink.  This stitch is another variation of the buttonhole stitch above, only it is a little bit thicker at the base.   You can do it decoratively, with different coloured threads, like I did, or using the same coloured thread.  You could even do the second part with a ribbon, if you wanted to get fancier.


This last sample, the bottom row, was from a link, that someone commented on Sharon's blog and shares what she did with the buttonhole stitch.  This person was the only one I saw so far, that incorporated beads within the stitch.  Check it out here, from Queenie - http://fat-quarter.blogspot.nl/2013/12/reversed-buttonhole-bar.html/.  My version above was done with a dark salmon coloured thread and Mother-of-Pearl pink beads.  In this example, all the parts, bars and second level of stitches were done with the same salmon colour.

Basically, this stitch has the first layer, the buttonhole stitch, the second layer the "reverse buttonhole" and you repeat two layers of the reverse buttonhole stitch on the other side of the beads.  It does stand out a bit more than just the simple traditional version of the buttonhole stitch.  Queenie's version looks a bit more substantial.  Maybe she used shorter bars so that the second layer of stitches lay closer together?  I'm not sure.  I will have to play with this one and see if I can duplicate her technic.

Have a great weekend everyone!

Modern version of the 3-way BOM quilt

Blogger has been acting up these past couple of days.  Wasn't able to upload pictures.  But I finally found another way to do it.  Hopefully they will get it fixed soon.  It was so much easier the other way.

I have been going though a bit of sewing/quilting withdrawal this past week.  Tax season is fast approaching here and I needed to get all my paperwork in order.  Just a few more details and I will be done.  This weekend promises to be another very busy weekend.  I have plastering to hopefully finish, and prime. There is the big cleaning to do of all the plaster dust that seems to get everywhere.  I have customer quilts to get to and numerous other maintenance/fix-ups to do too.  

BUT!!!  I really needed a fix with some time in my quilting room, with me and my fabric.  So.....I pulled out my modern version of the 3-way BOM quilt.

I had two blocks left to do for this BOM.  Here is the first one.


And here it the second one.  I like how the solids in this block make it pop.


I've chosen a black solid for the sashing and first small border.  I will follow it up with the skating dogs and cats for the last border.  

I'm not sure if I have succeeded in satisfying my quilting fix, but I am feeling a bit better. 

Tuesday 15 January 2019

Gathering flowers quilt second two blocks

I was having a pleasant time, just mellowing out after the Christmas rush.  I finished the first two of my Gathering Flowers applique blocks and was enjoying the process of picking the colours, cutting the pieces, etc.  The slow pace was meditative.  By this point, I had decided to take the day and continue to work on these blocks.

The next block, number 3 of 20, is my version of the Primrose block, this one came from an unknown source.  I just varied up the buds at the corners, by using the 3D pleated buds.  The green stems on the background fabric were already done during the first go round.  I only have about 1" of one stem to complete, hence the thread still dangling.


For my next block, number 4 of 20, I am doing the Crossed Leaves from page 64 of Mini Dietrich's Baltimore Basics book.  This is my first draft.  I am finding this to be a bit too predictable, maybe even boring, so instead I am thinking of changing it to, the second level of leaves the lighter green and the tip leaves in a yellow instead, just like the picture in her book.  I guess I will wait to cut the new pieces later, when I am ready to assemble this block.


Doing these blocks, as I mentioned above has been meditative and fun at the same time.  So much fun, that after lunch that day, I just jumped right back into it, to work on some more.  Stay tunes for the others in a future post.

Have a great day everyone!

Monday 14 January 2019

Gathering flowers quilt first two blocks

During the Christmas holidays, right after all the unwrapping of gifts, food and family gatherings, the kids were content doing their own thing and vegging out.  I hid away in my quilt room and did something more relaxing than my usual.  I figured there was no way I was going to finish the December's challenge quilt, so no reason to stress out about it and break my back (figure of speech), trying to do it. 

Instead, I took something out that I have been really wanting to do.  The suspense has been building to start on this one again.  It's my Gathering Flowers appliqué quilt.  It's a beginners Baltimore Album design.  

For this quilt I have numerous blocks started.  I believe more than half of them.  I stared with making stems.  Green and blue.  The green ones for the stems of flowers and the blue for baskets.  The one below was the first one I started (1 of 20).  This block with a starburst of leaves with berries is called Spreading Leaves from page 29 of Kay MacKenzie's Inspired By Tradition book.


I did a leaf at the time and realized I needed to build up to the skill level needed for needle tune appliqué.  So instead I turned to the technique of making stems.  This time around, I decided to cut out all the pieces needed for the blocks.  It may be difficult to see, but there are two shades of green to make up the leaves and three shades of pink or red for the berries.  

This block is now a grab-and-go piece.  I could take this with me on my travels and work on it during free time.  After I cut the pieces, I took the leaves that I had done off to redo.  I like them better now.  I did not take to the needle turn method, so I did them using another technique that I've learned since.

This next block with it's fancy weaved flower basket is 2 of 20.  This one is called Curved Basket from page 87 of Mini Dietrich's Baltimore Basics book.


These were the stems I was talking about above.  The stems are made in advance, like a skinny tub, that you appliqué to the background fabric.  I had this basket done the first time around and this time I cut out all the remaining pieces for the block.  It looks a bit like a mess of colour right now, because the pieces are larger than their final size.  Once I take in the 1/4" seam, they will all fit in nicely.

I especially like this block for its basket.  The appliqué is actually 3D. The stems do "weave" in and out of each other to create the basket.  I also like the curve, of the rim, that goes on the basket at the top.  Another unique thing about this block is the 3D flower buds.  On the square paper holding my cut pieces, the bottom two flowers are the buds.  They are folded fabric, that make up the buds.  It will be cute when it is completed.

So, this is where it sits.  I won't be working on these anytime soon, but I did enjoy playing with the fabric and colouring in the picture using fabric.  

I did put this quilt on my UFO challenge list for 2019.  I get excited just thinking about when this quilt's number may be picked.  When American Patchworks & Quilting pick the number 4 for their UFO challenge, you can bet I will be shouting for joy.  

I know I will not get this done in a month, but I will be able to work on it guilt free and take it, that little bit further.  

Sunday 13 January 2019

Finished quilting my snowflake wall hanging

Last year for Christmas my daughter gave me this wall hanging top.  She made it all on her own, without me even knowing about it.  These are hexagons that she lovingly sewed by hand.  She sewed them into this design of her own. Though she did raid my stash to make it....lol.

I am in the process of making seasonal wall hangings for the hanger/shelf in my quilting room.  The year before giving me this one, she made me one that I put up in May, about a Mother's love.  This one is going to be for January.


It took me a whole year to get up the nerve to quilt it.  She did such a fabulous job of assembling this, all by hand, with tiny tiny stitches, that I was afraid to ruin it.  As you can see, I finally did it.  I worked on it during my Christmas holidays.  I wanted to have it ready in time for this January.  The quilting was quite intense, as these little hexagons are only 1" across from flat side to flat side.  Don't look too closely, it's not perfect, but now it's done and I can enjoy it on my wall.


Doesn't it look gorgeous!  She did this for ME!  I am still blown over by the fact that she did this for me and that she designed it all on her own.  Did I tell you, that this is the first time she has worked with and finished something with hexagons?  First time and this baby lays flat!  Amazing!

Loving it on my wall.  Thank you, Bébé!

Saturday 12 January 2019

Batik pinks and greens quilt

My customer, Janet, was a very busy lady.  This was the third quilt she had for me to quilt.  Unlike the last two mentioned in yesturday's blog post, this one I did get pictures of.  The only reason I remembered, was that I was on my way to the guild meeting to deliver the quilt, and when I stopped to pick up my mom, I remember that I didn't get the pictures.

This quilt is beautiful.  It's made of batiks in different shades of pink, green and some blues.  I don't know the name of the block, but I like how it distributes the colours.  The colours in the picture are a bit muted, as the photo was taken in the evening with only the lamp lights on.  The true colours are more cheerful but not loud.


When I look at this quilt, I think of a pretty garden with flowers all in bloom.  Maybe that is why Janet chose the border fabric that she did.  This large quilt is going to one of her teen aged granddaughters.

For the backing fabric, Janet, used solid navy blue, pieced around and between the bright fussy cut hummingbird blocks.  When I initially saw the "solid dark" fabric, my brain went into overdrive trying to figure out how I was going to quilt this, and more importantly with what colour thread.

With a solid coloured backing and with a very dark fabric, a lot darker than the top, I kept thinking that everything is going to show.  This had to be done with precision. Yikes! Even after the length of time I have been quilting, I still get nervous with a solid coloured backing.


In the end, I chose to go with a dark grey thread.  My main concern was the hummingbird blocks.  I didn't want to quilt overtop of the hummingbirds and distort the pictures.  As I used Glide thread, even though it was dark grey, it blended in well with all the colours and is almost invisible.

But look what it did to the navy blue!  It added gorgeous texture of flowers, that creates a backdrop for the flying hummingbirds.  The grey is dark, so it only shows up enough that you can see the pattern, but it does not distract from the backing as a whole.  


The front of the quilt is beautiful, and the backing can also hold up it's own.  To me, this quilt can be considered a reversable.  Pretty on both sides.

Another great quilt!!!  Well done Janet!

Friday 11 January 2019

Brown rail fence variation

This was another quilt I finished back in November I believe.  I am so bummed that I forgot to take proper pictures of it.  This is a customer quilt.  Her name is Janet.

Janet did a lovely job with this top.  It's a rail fence variation that was made with different shades of brown.  The variation part is that one of the rails, in each block, is pieced squares the full length and width of a single rail.  Janet made this large lap size quilt for her son, for his couch.


I'll see if later I can get her to send proper pictures of the quilt for me.  She had given me another quilt assembled in a bar quilt form/style, done up in grey oriental type fabrics, that she made for her daughter, however I did not get any photos of that one.  That was when time was starting to slip away.

The grey lap quilt was also gorgeous and had a modern flavour to it.  It was made to highlight large print fabrics, so you didn't have to cut it up small and the prints are what really made the quilt standout. There was also a thin 1" off-white sashing between the vertical rows to separate the prints.

I am sure both her son and her daughter will love their quilts.

Thursday 10 January 2019

Batik coin box quilt

Since October, I have many finishes, for myself and for some clients.  The problem is, I forgot to take pictures of all of them.  I do have some, which I will share with you in the next few post.

This is the first one.  This is a customer quilt.  Her name is Teresa.  I call this quilt coin box, as I believe that is what the block is called.  It's pretty up close where you can really see the different shades of colour that you get with batiks.  Unfortunately I forgot to take close up pictures.


Teresa tells me that she won the jelly roll that was used to make this quilt and she only had to buy the light batiks, the orange border and the last border.  This quilt is queen size and to please her hubby, she decided to use a wool batting to keep snug and warm.

Very nice quilt Teresa, great job!

Wednesday 9 January 2019

A Girl Guide t-shirt and sashing quilt

In late November I was asked to do a special quilt for a women's granddaughter.  She is elderly and her eyesight is failing, so she could no longer quilt her own quilts.  That and her mid-arm set-up was broken.  She had been calling around trying to find someone to quilt her quilt for her, but people were either not interested or never called her back.

What made this quilt special to her, was that her granddaughter brought her a bunch of misc. t-shirts, swimsuits, a girl guide sashing and vest and asked her to do something with it.  Her granddaughter is in her late teens.  She really wanted to make her granddaughter happy.

This woman, now my customer, cut up all the various items and started to applique them onto a yellow background material.  The quilt was to fit a twin bed.  The top was set to read the Girl Guide group name with the sashing cut in half with half facing/pointing up and the other half facing down, so the badges would face in the right direction.  She even added iron on words to spell Girl Guides of Canada.  She sewed on the background fabric for the sides to fall down the side of the bed.  On these pieces, she added the t-shirts, shorts and swimsuits with labels facing upright.


She gave me this top with a flannel backing fabric and asked me to just quilt it with stippling.  I would normally do what the customer asked for, but in this case there was sooooo much background fabric, that I couldn't just stipple it.  Instead, I asked her if she would be ok, if I did some sort of grid design on it.  I drew out what I was thinking and she thought it was great.


Above is a section where I started the grid work.  I used the side seams as my guide and started with an echo line to define my grid area, and on the side panels, between the appliqued pieces I did some stippling.  Below is a picture of the echo line with one half grid work and the other half stippling.  You can also see the strap sewn into the seam of the two sides that is part of a t-shirt/camisole.   


She gave me this quilt with instructions that there was NO rush, that she was just very happy that she found someone to do it for her.  I told her that I did have other work that did have deadlines, as we were approaching Christmas, but she said again there was no rush.

Well, wouldn't you know it, she called me a week before Christmas and asks me how it was going and when I thought I might have her quilt quilted, as she had decided or hoped that she could give her granddaughter the quilt for Christmas....lol.  Never fails....

As it so happened, I had just loaded the top on the longarm the day before and was waiting for some time during my Christmas holiday to get started on it.  Because it was almost Christmas, I was very busy with shopping, cleaning, finishing the decorations, coordinating everything and dropping off other customer quilts.  I tell you it was crazy around here!  BUT add to that this quilt top that I now felt obligated to at least try and get done, before Christmas.

I worked on it daily for a couple or a few hours each night, until 11:00 pm most nights, after my full time job (who were asking for overtime due to the busy season...I did that too), plus trying to finish everything here at home.  Again I will tell you it was crazy around here....very crazy.

Christmas this year was on Tuesday.  Keep in mind too that even when the quilt top is quilted there is still the trimming and the binding to attach.  She called me again on the Thursday evening, asking if there was a chance it would be done.  I responded with, there was still a fair amount of work left, but that I felt strongly I would be able to deliver it to her, on the way to my Mother's house to finish a few things there, on Saturday afternoon/early evening.  She was so happy.  This would have left her with Sunday and Monday to put the binding on.

I worked on it, burning the midnight oil, as they say, and finished the quilting Friday evening (really it was the Saturday in the wee hours of the morning, but who's counting....).  I went to bed and in the regular hours of the morning, I trimmed the quilt, checked it over and took the time to bury all my starts and stops.  By afternoon I was finally done.  Wow!!!  That was tight!

I prefer not to have that happen again!  But I am sure it won't be the last time.....lol.

Tuesday 8 January 2019

Enjoying a relaxing day of quilting

New Year's Eve I had the day to myself, to relax and enjoy the aftermath of the Christmas gift giving, dinners and family get togethers.  Later that evening I had to get ready for a New Year's Eve dinner and bringing in the New Year, next door at my niece & her husband's home, but for that morning and afternoon, I had it all to myself.  

Hubby was relaxing with his paper and something on tv, my daughter was working, my son had taken to sleeping in until past the noon hour and my four legged little girl was curled up on her bed, that I brought into my quilt studio, so she wouldn't feel alone.

So......I set up my tablet to play Bonnie Hunter's Quilt Cam reruns while I sat to sew.  I was feeling content and happy to finally get some real time to sew.


I worked on some more 6-point star hexagon blocks.  I am finding some of these blocks very colourful, you could even say loud (lol), but the more I make and put up on the design wall, the more it seems to work.  The loudness of each block, starts to blend in with their neighbours.  It may be a bit difficult to see what I mean in the picture below, as it was taken in the evening, so the colours are not quite true.


With the making of more 6-point star hexagon blocks, came the making of more 9-patches as my leader/enders.  This time I got 19 of them done.  Not too much, but still progress.  A little here, a little there and soon they will be done.


I look forward to seeing both of these quilts done.  For January I need to really try and finish the star blocks for the challenge.  I haven't even started my label for another older quilt, that I also have listed to be done for January.  

Yikes!  We have only begun January and already I feel like I am behind, though at this point, it is only in my mind.  I'll have to change my mindset.  I don't want to feel like I am constantly running to keep up, but that seems to be the way or the reason that I get so much done.  Lol, I cannot win, as I cannot have the best of both worlds.  Oh well.  I will try though....