Sunday 31 August 2014

Second hexagon quilt

This is the second hexagon quilt, made by the same maker of the first hexagon quilt.  I will get the full details of name, date and place from my cousin at a later date.  Right now I am just so excited to show you  these fabulous quilts.

This one was also made using hexagons that measure 1 1/4" across.  The quilt was made in a single floret layout, with solid white between the floret.  Each floret is made using the same fabric with a solid white hexagon for the centre.  It measures 87" tall x 76" wide.  


Here is a close up of some of the fabrics used.  This represents a large sample of the fabrics used in this ere.  Another beautiful quilt made with precision.  The picture may show wrinkles but the actual quilt lays completely flat.  I will have to iron carefully before quilting this.


This quilt is also considered done by the maker based on the edges. The top and bottom rows are only 3/4" florets.   I have been looking into the antique/vintage grandmother's flower garden quilts and noting that all of them are quilted just inside each individual hexagon about 1/4".  Only the newer quilts vary from this.  I haven't seen a quilt with this layout yet.  Most of the single florets have a hexagon corner stone between all the florets.  


Just like the first layout that I found only one sample of, that was from a museum dated from 1870s, but was done in browns, beiges and some blues, this layout also seems to be rare.  Most of the grandmother's flower garden quilts are using a double row of hexagons and some with the dividing diamonds, mostly in green.

I will keep looking.  These hexagon quilts have grabbed my interest.  There are so many different styles and patterns it is unbelievable. More to come on hexagon quilts in future post.

Saturday 30 August 2014

First hexagon quilt

This quilt was wrapped up in a yellow bag in one of the boxes.  It is absolutely beautiful.  This is a completed top that measures 75" wide x 90" tall.  The hexagons were sewn into a diamond shape of two rows of hexagons, and surrounded by a sashing of solid white hexagons.  The workmanship on this quilt was superior.  The hexagons are pieced with such precision.  All hand stitched with tiny stitches with no pleats or bulkiness anywhere.


In my opinion these hexagons are made with old fabrics from some time in the 1910-1920s.  They measure at 1 1/4" across.  This quilt was finished with a solid white border of hexagons going around the whole quilt.  The top and bottom of the quilt were made to form a straight line of hexagons and the sides that would hang down the side of the bed are scalloped, using the diamond shape to form the scallops.


I have never seen anything so beautifully well made as this old quilt top.  There are so many different fabrics in this quilt, I could spend hours exploring them all.  Before I get started finishing this quilt, I am going to take my time studying historical quilt books to determine the best way to quilt it.

I want to keep to the time period of this quilt as much as possible.  I will most likely use muslin for the backing, as was the norm for older quilts, as it would have been the more cost effective way to finish a quilt and would have shown off the quilting the best.

For the binding I am going to use the traditional method of following the individual hexagon shapes.  It will be more involved and time consuming to contour all the points, but I couldn't do it any other way.  I am positive the maker wouldn't have made it any other way either.

Friday 29 August 2014

Working on Midnight Flight while watching Quilt Cam

Yesturday morning I went to work out, and picked up some groceries for lunch and dinner.  I wanted to finish the front of the house.  All I needed to do was paint the garage door and framing to match the new neutral windows.  Once that was done I figured I deserved some me time.  I have been go, go, go all week and it is catching up to me.  

After making dinner, I set up my laptop with a couple of Bonnie Hunter's Quilt Cam episodes and sewed.  I managed to get all the green pairs sewn. Bonnie is like having a friend sewing along with you.  You can listen while you sew.  You don't need to actually watch her, though some times she sows you pictures or what she is working on.


Once my pairs were sewn and partially sorted I switched to the most resent Quilt Cam and continued to sorted the rest of the pairs.  I made the four patches.  I would say about half of them are now done.  These blocks finish at 3" square. I really like this size.  They look cute.


Today it's off to my parents to finish some more tomatoes.  Three bushels to do.  One for diced tomatoes, one for marinara and the last one for tomato sauce.  Won't be getting any quilting done, unless it is toward the end when we are waiting the couple of hours for the sauces to boil down.

Thursday 28 August 2014

Pleated log cabin blocks

Yesturday I was going to go to my parent's home to do more tomatoes, but my mom called to cancel, as there were not enough ripe tomatoes.  Instead I did some home renovations.  My husband and I under cut the front entrance closet doors, installed the magnetic door stoppers and the door handles.  We finished my closet doors and installed my husband's closet doors as well.

This took us to about 3:00 pm, when I received a visit from my cousin, her husband and my uncle.  At my niece's wedding on the weekend, my cousin and I were talking and the topic came around to quilts.  She had mentioned to me a while back about having some quilt pieces and parts that she was hoping that I could help her with.  She was telling me they belonged to her husband's mother and his grandmother.

She called today to confirm I would be home.  When she came, it was with two boxes and a couple of bags.  The boxes stayed behind.  I will share with you, all the goodies that were in the boxes in future posts. There are some quilt tops needing some quilting and some parts needing assembly.  All that I was thinking at the time was wow!  I am sure that at the time my mouth dropped.  The stuff she was showing me was wow!  It is difficult putting it into words.  The fabrics were old. The workmanship was amazing and the patterns were traditional.  I was just blown away by it all.


One of the bags had a completed quilt, in a fan design, that was old and worn.  So worn that the fabrics were shredding.  The quilt was beyond any help.  I suggested that she find a small section on the quilt that she could fold it to display and use it solely for show.  In the second bag, there were some other small embroidered blocks and bed sheets that may have been intended to be used for backing.  She thought the embroidered blocks could be completed at another time, as she felt it more important to finish some of the other more advanced tops.

This was one of the projects from the boxes.  These are in no particular order.  This first one is a pleated log cabin block.  These blocks were made by sewing the individual logs onto a piece of muslin.  Many of the logs appear to have been torn instead of cut.  The blocks measure approx. 8" square, give or take a 1/2", so should finish at about 7 3/4".  There are 71 blocks in total.  My cousin's husband chose a barn raising layout to set the blocks, starting with the light centre radiating outward.  When completed with 64 blocks (8 x 8), the quilt centre will measure about 62" square.  Add in some borders and the quilt will measure closer to 80" square.


All of theses blocks are scrappy for the dark side and on the light side one consistent white fabric with little Xs was used.  They are gorgeous.  The darks are not truly all darks, and some of them could actually pass as a light fabric.  I can't wait to work with these blocks.  I love looking at these old fabrics.  They are so different than the fabrics available now a days.  This quilt will have a completely different feel to it.

Stay tuned for the completed quilt.

Wednesday 27 August 2014

Not much quilty to post

There is not much quilty to post for yesturday or the day before.  Been busy with other things.  Monday my front window and front door were installed. Took most of the morning and part of the afternoon.  I got started on my daughter's room. By the time I finished filling holes in the facing and baseboards, painted two coats on her walls and one on the facings and baseboards I was heading to bed a 1:45 am.

Yesturday I woke at 8:00 am and started right away on the second coat of paint on the facings and baseboards.  I washed up any paint off the floor and washed all her furniture before putting it back in her room.  Once I finished this I had to run to the grocery store for basil, lemons and onions to do the tomatoes.  By the time all this was done I arrived at my mom's house at 2:30 pm.

We got right into the tomatoes.  My daughter dicing, my son washing, my mom sorting and myself peeling. All day we were doing various task.  Two extra large pots on the outdoor burners one with twelve batches of tomato sauce and the second one with marinara sauce.  By the time these were cooked and jarred it was after 12:30 am.

Another late night.  I am tired, but today we are in for another busy day of tomatoes.  My mom still has a bushel and I have another three.

I do not see much quilting going on in the next few days but we will see.  Will need to get my fix.

Monday 25 August 2014

A tooth fairy

My nieces wedding in Saturday was beautiful.  The party was still going strong when we left at around 12:30 am.  By the time we got home and in bed it was 1:45 am.  My bodies alarm clock still had me up at 7:00 am. Yuck!!!  Especially since the morning before I was out of bed at 4:30 am.  I don't know what is going on, but I am going through a sleep deprivation stage.  Luckily for me later that morning while I was reading I fell back to sleep and did not wake until 11:45 am.  I felt much better.  I really needed it.  

When I woke up it was time to make lunch.  We decided to make burgers on the barbecue.  I got outside and a brain wave hit me to set up the barbecue area that I was meaning to do all summer, since I planted the side garden that I posted about.  It only took my husband and I two hours to move all the slabs for the surface of a patio, out the back sliding doors.  It is looking cleaner now and there is now the room to put the barbecue.  We even made somewhat of a bench with a wide board and some buckets.  It will do for now.

My daughter and I ran up to The Hobby Horse, for a piece of black fabric that I ran short on, for my Christmas quilt.  I was so glad they still had some.  Only .94 meters on the roll.  So glad they had even this much.  I took the whole thing even though I only need about 1/4 meter.  From there we went to IKEA for simple curtains, for my daughters room and to Home Depot for some paint.  My daughter's birthday is coming up and I told her I would do her room during my holidays.  That is what I will be up to after I write this post.


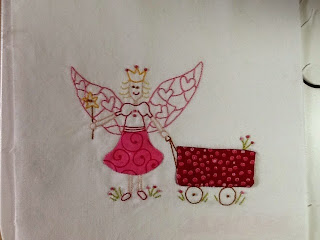
This morning while sitting and having my tea, I finished the Tooth Fairy needle work block.  It turned out pretty.  This is the first of two I want to make.  The next one is going to be done in blues.

Saturday 23 August 2014

The pile of scraps to cut is dwindling

Well, today is the first day starting my holidays.  Another early riser.  Just could not sleep past 4:30 am.  I am hoping this early morning is not going to affect me latter in the day as it is going to be a long busy day.  Today is the day my niece gets married.  She is also my goddaughter.  The wedding is not until 4:00 pm, but my daughter and I have our hair appointment at 10:00 am and our nails.  Still have to iron the men's shirts, get the card, look into foundation for my daughter and all the little things that get delayed until the last moment.  Did I tell you that I am a procrastinator.  Too much to do in so little time.  I keep telling myself we will get though this, we will.


This past week I have been working on a lot of little things here and there.  I've notices the pile of scraps to cut is dwindling down.  My ironed pile and my basket are noticeably lighter.  I've been working on cutting a bow tie from each fabric I work with and cutting them down to 2" strips and squares.  With whatever is left over I cut into 1 1/2" strips and squares.  These bow tie parts are the darks waiting patiently for their  light parts.


And below are the bow tows that are matched up and ready to be sewn.  I will put these beside my machine to sew as leader/enders.  This pile consist of all the dark blues from my nieces Midnight Flight quilt.  It is amazing how quickly these things add up.


Did you notice the jars in the picture above.  I think they are cute, I have a fetish for jars.  One of them is holding my parts of Bonnie Hunters mystery quilt, Celtic Solstice.  I am droning mine in Christmas colours of red green and gold with black.  The second jar is for my ridiculously small half square triangles from bonus HST the Bonnie way, from previous quilts.  They measure 1 1/4" in size and would finish at 3/4".  I know ridiculous, but I want to try it. I want the challenge.  I will continue to collect them as I do various quilts until I fill the jar.  I will figure out what to sew the into.  This should to be interesting.  So far the majority of the HSTs are from my daughters Easy Street quilt.  Another of Bonnie's patterns.

Friday 22 August 2014

Started sewing some two patches

I started sewing some of the two patches for the Midnight Flight quilt.  On the back table I have some of my pairs sewn together.  I started putting them through the machine as they came, but decided to do just the greens first, so that I could sort them and assemble them into four patches. 

When I sew these I would usually run the pair of blocks through the machine with the dark fabrics on the bottom.  Always dark on the bottom so you will do the blocks always the same.  This is important if you want to twist you centre seams, so there will not be as much bulk, both in the centre and at the joints.  It also orients the seams in the same direction, no matter how you turn or situate your block.


I am almost half way there.  This next picture is what I have left to sew of the two patches.  All together I have 1176 pairs to sew together using 1 1/2" squares, sew them together to make 588 four patches, that makes 294 blue four patches and 294 green four patches.


Last night when I got home I was too tired to finish pinning my daughter's quilt.  Maybe tonight I could come home and finish it and work on getting this pile of squares at least to the sewn into pairs stage.  I will be on holidays this coming week. Hoping to get a lot accomplished, however most of the things needing to be done are house related and jarring up some marinara sauce, pasta sauce and diced tomatoes.  Four large bushels full and that is just for our house.  There will be at least three bushels for my parents. Busy, busy, busy.  Just hoping to also get some sewing time in.  Am I asking for too much. Spreading myself too thin. Who knows, but if it is not on the agenda the likeliness of getting done is not. 

Thursday 21 August 2014

Pinning my daughter's quilt

Last night I had some time while my son was out at his soccer game to do some quilting.  I decided it was long overdue to start on my daughter's quilt.  She has done a great job with making her quilts over the summer that I want her to be able to enjoy them.  This quilt was the fist one she finished.


As we were sitting there admiring her finish, she notices an error, right in the middle of her quilt.  She pointed it out and asked me if I would fix it for her.  When I get frustrated with a seam for not cooperating she constantly steps in to take care of it for me.  We sit and chat while I continue with some other step and she dutifully rips the stitches.  Now it was my turn to reciprocate.  I told her how since she is always ripping my stitched that it would only be fitting for me to do the same.  She laughs as she knows she has ripped out many of my stitches.  We've discussed it at some time how it is always easier to fix someone else's stuff than your own. 

Last night I fixed the one block that was facing the wrong direction and decided to go further and start pinning the quilt.  And there it sits this morning, still waiting to be pinned.  When my son got home and took a shower, he wanted us to read together.  Hard to refuse an undemanding child one of his few request.  So, I just left the quilt as it is.  Maybe tonight after my late night at work I can finish it up.

Wednesday 20 August 2014

Reconstructed quilt #6 - 6-Point Star

This is the last of my reconstructed quilts.  The 6-point star quilt.  This one also has Y seams.  So far the quilt is all deconstructed. In the picture below you can see the parts pinned together for each block.  The left hand side are all the pieces ironed and trimmed, ready to be sewn.  Peaking from underneath the parts in the middle of the drawer you can see my diagram of what the quilt is going to look like.  All the fabrics in this quilt are from recycled clothing or household articles.


This will be an unusual quilt with a large variety of unusual fabric.  I've made four blocks so far to get a sample of what it will look like.  I am still not sure what I think about it.  I just keep thinking, this will be an unusual quilt.  What do you think?


I haven't worked on this for the longest time.  Many years have past I am sure.  My chart says I started working on this one in June/2007, but I am not sure how long it took me to deconstruct it, iron, trim and make these blocks.  It will sit for some time still, until I get motivated to start up again. At this point though I have so many other things I want to complete first.

Tuesday 19 August 2014

More quilts at the Creek

I had to show you this quilt.  It is from one of Bonnie Hunter's patterns.  This is one that I was planning to make at some point in time.  I was possibly thinking in neutral colours with the black for the outline, for another one of my nieces.  That would be her preferred colour scheme.  The only thing holding me back is the fact that I have never been a neutral type of person, so I am afraid I would start it and would get bored of the colours and not finish it.  My daughter reminds me that you are not supposed to match the quilt to the room, but in this case I don't think my niece would use it on her bed if it didn't match.  Who knows, I may just do it anyways.


I took this picture solely for the layout. I thought it was different, striking. Beautiful.  The only change I might make for this quilt is to have it more scrappy.  I prefer my quilts that way, but I am sure that more people prefer an organized selection of colours. 


This next quilt was.....yes, another log cabin quilt.  These logs were approximately 3/4" wide with a double sized centre square.  This quilt felt like it had that aged look.  Not because of the fabrics or anything like that, but because the quilt had that soft washed feel to it.  The feel that you only get with age.  It was pristine and showed the care in construction and preservation.  I like the layout as well.  From the picture you would think that the maker only used darks and lights, but up close you can see all the medium lights and medium darks that were used as well. Beautiful quilt.


I think these two nine patch variations are nice simple quilts to make for a new arrival.  They can be made up in no time at all and are pretty in any colour choices.  I was thinking of making a large red and white quilt after I make my red and white Northern Wind quilt.


There were many, many more quilts at the show.  Too many to show on my blog.  From the pictures in this post and the last one, you can see I have a fondness for log cabin quilts. 

Monday 18 August 2014

Quilts at the Creek

The York Heritage Quilt Guild had the quilt show at Black Creek Pioneer Village.  The show was called Quilts at the Creek.  They had many quilts displayed throughout the village.  The village was also open so as you viewed the quilts you could also check out the different establishments throughout the village.  Nice place to visit and the children get a real eye opener with how things used to be without electricity.


I would have to say that about one third of the quilts were a variation on the log cabin quilt.  The quilt above was about double sized and the log cabin was a half log cabin variation.  If you look at the picture below you will see a close up.  The unique thing about this one that I cannot show you in the picture is that each one of these logs actually only measure just over 1/4".  The total block measures 2".  Amazing!!!  This quilt would have taken the ultimate amount of patience.  Can you imagine how long it would have taken to make this double sized quilt.  Insanity.


This next one was squares surrounded by squares in three different sizes.  All of these fabrics were recycled shirts.  I like the jean coloured look with hi lights of navy.


This next one was also a variation on the log cabin block. This was a half log cabin block and sewn in diamond form, which was assembled in cube shape to look like the tumbling block quilt pattern.  This was very well thought out. Check out the close up below.  Very good.


This was just a small sampling of the quilts at the show.  I will show you some more, maybe tomorrow.  I enjoyed the show and all the quilts.  From these pictures and the ones I will show later I can see that I am once again drawn to the log cabin block and all it variation and settings.  I still have to quilt the one I have done, but I can see me wanting to start another one soon.

Sunday 17 August 2014

Two quarter blocks done

I finished cutting all the parts for Midnight Flight.  Not all of them are seen here.  Too many for the one container.  It took a while to cut.  I had to cut a total of 384 dark blue half squares, 544 dark blue rectangles, 160 - 2 1/2" aqua blue squares, 160 - 2 1/2" lime green squares, 580 - 1 1/2" aqua blue squares, 580 - 1 1/2" lime green squares, 384 neutral half squares, 768 - 2 1/2" neutral squares, and lastly 1160 - 1 1/2" neutral squares.  All of this for a queen sized quilt including the pieced border.


I was so excited to finish the cutting that I had to make the two quarter blocks that make up the whole quilt.  One is the lime green going up to the left and the second one is the aqua blue going up to the right.  I like it, but had to put it away to head over to my parent's for dinner.


Today I am sorting the fabrics to distribute them evenly between the lime green and the aqua blue.  I am hoping to also get a chance to visit the quilt show organized by the York Guild at Black Creek Pioneer Village.  Right now the children are still sleeping off their late night, and I am going to continue sorting and getting some sewing done.

Saturday 16 August 2014

Still cutting up parts for Midnight Flight

So, today is going to be a busy day. Outside of leavening in the late afternoon for my parents home for a dress fitting, I will be doing a little bit of this and a little bit of that.  My daughter is havering a weekend sleep over where they include my son in the days activities. My husband will most likely putter around and I will be trying my best to get many things done in my quilt room as well as around the house.


Today my goal is to finish cutting up the parts for the Midnight Flight quilt that I am making for my niece and her husband.  I am already almost done.  Only have the neutrals to cut.  I plan on starting the quilting of the borders for my friends quilt.  Yesturday the designs came to me while I was listening to the chatter of the girls.  The ideas come at the most unusual times, but I go with it and my children don't think anything strange about it.  They were even helpful with fine tuning the ideas with me.

I am just finishing my second cup of tea and ready to tackle everything that I want to get done.  I will share it with you in some future post.  Enjoy your Saturday, wherever you are.

Friday 15 August 2014

Reconstructed quilt #5 - Bow Tie

This is one of the last two reconstructed quilts that I am currently working on.  I really haven't done much of it yet. I purchased two separate bow tie tops, because the price was right.  When I received one of them I was quite disappointed in the top, the construction, the size and the quality of at least 1/3 of the fabrics.  A lot of them had holes or stains.  When the second one came in, I was worried as to what I would find.  To my delight this one was mostly all good.  Outside of the size and the wonkiness the top was in good condition, and the fabric were nice.


Everything sits patiently in a drawer waiting their turn to come out and play.  So far I have the two quilts deconstructed and discarded all the bad fabrics.  In the drawer there, you will see the mint green peeking from underneath the pink/peachy fabric.  The green is going to be my constant in the bow ties and the pinkish colour will be the backing.  Even with the two tops I will only have enough fabric to make one lap size quilt.  I may add some of my own fabrics that I have been collecting, from the 50s/60s.  Some of the fabrics look like men's shirts or women's house coats or day dresses.  This was definitely a scrap bag quilt.


This picture is of the blocks I have assembled so far.  They are all constructed using Y seams.  Something new for me.  It is a bit of a challenge, but now that I have been quilting for just over 11 years I feel I can handle it.  Each block will be made using four bow ties and laid out in this pattern.

Thursday 14 August 2014

Cutting up quilt parts for Midnight Flight

Last night I started a new quilt.  Always something exciting for me.  On the weekend I purchased Bonnie's latest book More Adventures with Leaders and Enders.  I couldn't wait to purchase her autographed copy.  You can see part of the quilt I am going to make on the cover.  On the top left hand corner, you can also see my daughter's quilt that she just finished, called Easy Street.  There are some nice quilts in this book.  Not surprising if you've seen her other books.


The picture was taken at night, so the picture is not the greatest for showing the true colour of the fabrics, but you get the idea.  I have my book and my paper with the number of units I need to cut and I am ready to tackle this quilt. I needed to start by calculating what I needed to make this quilt bigger by one row on the side and one row on the bottom.  I finished cutting out all the lime green parts for a queen sized quilt.  I cut some of the dark blues and some of the neutrals.  Later tonight I hope to cut out some more.

Wednesday 13 August 2014

Reconstructed quilt #4 - 8-Point Star

These are the some of the 8-point star blocks I purchased.  The blocks were all done by hand. Unfortunately they were appliqué onto fabric that was not good.  Some had wholes on the background fabric and some had rust stains or old blood spot, hard to tell.


Here is a close up of a block with a stain in the bottom left hand corner. Of this block I had to replace the solid light blue fabric as well due to the quality of the fabric.  For this quilt I took all the stars apart, reconstructed the stars and appliquéd the stars to white fabric.  This was my first quilt that I did by hand, so it took me a while. Once I finished the blocks I had to come up with a layout.  I decided to sew sashing on in a sold greyish blue colour, trying to keep the quilt looking like something from the period of time which the blocks were made.


The quilt is king size. That I think, is the reason it took me so long to get to the quilting, that and the fact that I was trying to figure out the quilting designs I wanted.  Due to the size and density of the quilting patterns it took me quite a long time to quilt as well.   I like the choices I made and the flower design I designed for the corners.  They are simple and well suited for the quilt.


Here is the completed quilt.  My daughter-in-law took the picture of the finished quilt for me. I forgot to take one before they took it home with them to New Brunswick.  Aren't my grandchildren beautiful.   I really like the crinkled look of the quilt.  It adds to the look and feel of age, even though most of the quilt is new.  At least the blocks are made into a quilt, instead of sitting and rotting in someone's drawer (the holes may have been done by moths).  In this case and in all the reconstructed quilts I have done so far, I do feel were worth making twice as the title of the book states.

Tuesday 12 August 2014

Had time to pin a small quilt

A while back my daughter made this simple square blocks quilt to learn how to quilt.  The fabrics were not her colour choice, but were something that was given to me for donation quilts.  The size is a wheel chair lap quilt.  The fabrics are more for an older person in beiges and a touch of light blue with mainly large floral designs.  I am sure someone will like it.


She is going to start out with in the ditch and corner to corner on a diagonal quilting with a walking foot, and she will try some free motion stippling or loop-da-loop in the borders.  A little bit of everything in a size that she will be able to manage.  Once she does the quilting on this one, she can start on her little yellow quilt that will have a little more free hand quilting to it.

After my workout last night I came home and decided to pin the quilt for her.  It only took about 45 minutes to iron the backing, the top and pin the quilt, and off to bed for me.  I had an early morning, with waking at 4:30 am.  Just couldn't sleep, so I came downstairs and started cutting up some more scraps.  In the two hours before my usual time to wake up, I did quite a lot of cutting.  I have a nice pile of bow tie parts that can be sewn.  I now also have many 2" & 1 1/2" strips and squares to add to my drawers.

Monday 11 August 2014

Rare occasion of family quilting time

Yesturday, while I was cleaning up and cutting up fabrics for various quilts, my children decided to join me.  I was helping my daughter with her borders,  helping my son with his new quilt, as well as cutting up scraps for my nieces quilt and the bow tie blocks.  A very hectic quilt room.


These fabrics are what I will use to make the Midnight Flight quilt that I discussed on a previous post a couple of post ago, from Bonnie's newest book.  The colours look a little yellow here in the picture. One of the chains going in one direction will be lime green, the second on will be blue turquoise.  The stripes the form a sort of star will be dark bright blue all the way to navy and my neutrals will be white based all the way it very light blue.  No pink for this girl.  The two colours she cannot stand are pink and red.  She will tolerate yellow and lavenders in small doses, but otherwise anything goes.


These are the blocks my son was working on. He is working on a quilt from Bonnie's site called boxy stars.  These are going to be scraps from my 2" drawer.  This will be his first bed size quilt.  This is the first one that he is doing with corner like this.  He is having to learn precision.  He has taken a few stitched out already, but he is doing well.  Here are four of his blocks to make a complete block.


Sunday 10 August 2014

Helping my daughter with her borders

My daughter finally finished all three quilts.  This first one was the Bonnie Hunter Mystery from 2011-2012.  She started it with everyone, working away at all the clues.  She was doing well.  She had a few step backs with her school load increasing and various things throughout this time.  Sabryna managed to get all but five blocks completed before having to put it away for a bit.  This summer holidays she got the energy to tackle the blocks and go on to finish the borders.  Sabryna's version of Bonnie's mystery quilt was to put the blocks straight, not on a diagonal,  this created the black grid on a diagonal instead.  She did a great job of it.  This was her first queen size quilt.


After she finished her centre of the Easy Street Mystery quilt in the picture above Sabryna worked on the four patch blocks and HST blocks for her 16-patch pinwheel quilt.  Unfortunately it took her a few days, because she had all the pinwheel blocks done before realizing that half of them where backwards.   She was a trooper and took them all apart right away and continued to assemble them all over again.  Once she made the decision to do her second border in strips, she didn't take long to finish them.  I like it.  It looks real sharp.


Lastly, Sabryna finished the borders on her alternating 9-patch quilt.  This one is being made to give away.  Sabryna is going to practice her quilting on this one. Simple quilt and very pretty in girl colours. I like the use of the yellow for her background.


Saturday 9 August 2014

Helping my daughter figure out her quilting

When it comes to quilting a quilt, a lot of people get stuck.  What to do, what to do?  There are so many different designs and styles that the possibilities are endless.  My daughter has not yet done any quilting, so we will have to keep it simple, or I will end up doing it.  She is working up her confidence to try, but because this quilt will be her main bed quilt she may decide to wait for a smaller quilt to try the free motion quilting and stick to in the ditch and straight lines.


She is currently putting the last border on while I write up my post.  Earlier today she took out some designs that I already had from other quilts.  She has narrowed it down to the two following designs, that would go in the block to the left, in the picture above.  The design needs to be enlarged to fit, from the last purple flying geese to the same on the other side.


She plans to do a straight line through the black squares that form a partial chain.  Between these black squares there are the larger green squares, that she was thinking of doing a double chain, as seen in the picture below.  After this she thought to do the design below the double chain design for the first border.  At least this is the plan so far.  It could change many times until it is done.


Her quilt is coming along very well.  In case you done remember from my earlier post of my daughter's quilt, this is a Bonnie Hunter Mystery quilt.  The pattern can now be found in her newest book More Adventures With Leaders And Enders.  Again, Bonnie has outdone herself. Many lovely quilts in this new book.  I have already chosen to make Midnight Flight, for my niece, in a different colour selection.

Friday 8 August 2014

Reconstructed quilt #3 - Dresden Plate

This is a Dresden Plate pattern.  I got this one on eBay for less the $10.00.  The fabrics in this quilt are true genuine 30s fabrics.  You cannot get anymore original than this.  Unfortunately the white background fabric is disintegrating.  As well as the workmanship is lacking.  The wide sashing do not match as can be seen in the photo below.  The stitches of the Dresden plates that were appliqué to the white background are visible and some were not given enough seam allowance that some of the plates are fraying.


This quilt was purchased as a top.  It has never been quilted.  I cannot understand really why it is shredding and fraying, as it is not finished and so would not have been used.  My thoughts are that the maker was very elderly and could no long see well to assemble the rest of the blocks.  I say this because the assembly of the Dresden themselves was done by hand and were done with precision.
It is either that or the top was made by two different people.


I am currently still working on this reconstructed quilt.  So far I have the entire top disassembled, some plates ironed, some cut and reshaped, plus a few quarter sections assembled as well.  I like this quilt top and all the fabrics used in the Dresden plates.  I haven't worked on this one in quite a while now.  Reconstructed quilts takes a while to complete.  They are tedious at times and usually take longer to make than starting from scratch.  Even though this is true, I would still consider purchasing  quilts or tops to reconstruct.  There is a certain feel to these quilts that one just cannot duplicate, especially considering that most if the fabrics I am working with are no longer available.

Talking about my reconstructed quilts has put them back into the foreground of my thoughts.  I am thinking it will not be long before I pull one of these quilts out to work on.  Altogether I have six reconstructed quilts.  Three of the tops are completed into quilts, two that you have seen already on previous posts, and three tops that are in the process of being completed.  These last three are more complicated, with two having Y seams and this one with the small wedges to sew with partial seams, to later appliqué to the background.

From this point on, I will track the progress of these last three quilts and share them with you, however I will warn you that it is a very slow process.  I can only work on them from time to time.

Thursday 7 August 2014

Taking time to do some quilting

Last night I had some time to myself.  No quilting bee and Son out with his Dad to soccer practice.  I have to get some things done and decide it is time to get back to the quilting I have to do for a friend. I can't show you the quilt yet, as it is not done, so I thought I would show you my changed design wall.


With the Garden quilt done, I hade a lot of space up top.  I decided to move my bow tie leader/enders up.  This is the width of the centre and now I will build it coming down.  Still no repeated fabrics.  I also decided to put The Farmer's Wife blocks away for now.  I still have 13 blocks to make before I work on the stripe corners using the scraps from the blocks.  Instead of  The Farmer's Wife quilt I thought I would do my Purple Stars quilt as my main work.  This block came from Bonnie Hunter's site, under Jared takes a wife. I am doing my version with sashings and corner stones.

I chose a soft blue purple and have some blocks already assembled.  At some point I saw a purple fabric that I really like and want to use it for the border.  The only problem is, the majority of the purple is a bright fuchsia purple with only a little blue purple.  When I realized I didn't like the border with my blocks I put them all away.


Some time after that I find another fabric I could use for the border that has blue purple in it.  The problem with this one is I find it bland.  I liked the spunk of the first choice.  After I took the blocks out again, it came to me to add some fuchsia purple stars to help the blue purple blocks blend in.  I have a lighter version made already.  Now I need to find a couple fabrics similar to the stripes on the right hand side of the picture above and maybe something in between them both.

This will be a change as you go quilt and if I end up with any extra blocks, I can either put them on the back or make some pillows with them.  No big deal.  I need a total of 24 blocks.  All the fabric is cut, except for the additional few colours.

Now I just need to assemble them, but first I have to finish some more quilting.  After my friend's quilt I want to start quilting my Log Cabin quilt.