Sunday, 31 May 2015

Working on the 3D pinwheel quilt

Working on the 3D pinwheel quilt. Yesterday, I finished quilting it.  I started the day by piecing the background, sandwiched it, did the stitch in the ditch to stabilize the prairie points.  By this point it was time to make lunch.  After lunch I started quilting the middle, and move on to the borders.  It was great, it went so smoothly.

I am so happy this one is done.  The shower is coming up shortly.  After dinner I ironed the binding and sewed it on.  Now I have to tack it down by hand.  I am not going to show any pictures yet.  Not until I finish the binding.

So.....instead I thought I would share with you part of my front garden.  This first picture is a view from a few steps down from the front door.  To the right of the picture, not seen here, is a bench.  This is about what you would see from the bench or the front window.  It is all new and still needs to fill in some, but it is getting there.


This next picture is the one corner beside the driveway, left of the picture above.  This view is from the walkway looking toward the house.  As you can see the walkway turns to the right and leads to the stairs on the left turn.


The pictures were taken right after a rain fall.  I love how the colours stand out so much after it rains.  The lime greens are brighter and the green of the yew bush seems deeper.  So pretty.

Today I did some more quilting on my log cabin quilt, but again I won't be showing you the pictures yet.  Not until the quilt is done.  I am hoping that will be soon.  I have been wanting this one done for quite some time.  Anyways I am hoping everyone had a great weekend.  Enjoy the rest of the night.

Saturday, 30 May 2015

Bottom floret number three is done

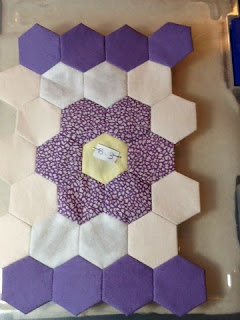
Bottom floret number three is done.  This floret is the only one that I have that will be this type of purple.  I like purple, but it looks too close to the purple of the border.

With the appliqué Tiny Town blocks that I am working on, this quilt has been put aside for a bit.  It only gets to come out when I am done my homework for class, so needless to say it is going to take a little longer to do.  That is ok though, as this quilt does not have a timeline and is something that I am enjoying the process of.  In between assembling these florets and the appliqué Tiny Town, I am still taking the diamond hexagons apart.  No rush there either.  Always lots to do.


As I said earlier, I like purple, so I thought I would share some of the purple blooms from my garden.  Here are some purple Japanese Iris.  The shade of purple can almost be described as blue.  What you don't see just yet is the bush behind the Iris. It is a Lilac bush and the colours of the blooms are a soft purple, almost lavender, but a bit deeper.  It it a young bush, as I just planted it last year.  It had only two blooms on it this year.  I am looking forward to next years blooms.


I also like my pinks.  Here I took a picture of the Bleeding Heart that I planted last year too.  Already this garden is looking very full.  Beneath the Bleeding Heart are some purplish pink ground cover.  If you look closely at the top of this picture you can just see a small bit of the purple Iris.


As you have probably noticed, I love my gardens.  They are a constantly changing canvas, with all the colours and all the different seasons.  Always a work in progress.

Enjoy the rest of the day everyone!

Friday, 29 May 2015

Starting Tiny Town block three for June

Starting Tiny Town block three.  This is the block for June.  We don't actually have a class for June, but I have to stay focused so I don't fall behind.  By the end of this weekend I should have one section of this block done.  I did start on the black post for the mail boxes.


This weekend should be better for getting some quilty stuff done.  The last couple of weekends were primarily working on the garden all weekend, all day.  I still have to do some weeding and clean up, but that is nothing compared to what I have been doing.

I am looking forward to a more relaxed weekend.  Hope everyone has a good one.  Cheers. 

Thursday, 28 May 2015

Finished Tiny Town block two For May

I finished block number two of the Tiny Town.  This is the bottom half of the block.  Finished it the night before class.  I like the background on this one, especially.  There are cute quilting lines on it.


This is the whole block trimmed and pieces together.  If I want to I can put blocks one and two together now, but I think I will wait until I have block number three done.  I can put the whole top row together.

 
Here is a picture of the pattern and the fabric they used.  It is amazing what the different fabrics will do to the looks of the block.


I even took a picture at class of some of the other completed blocks.  Some of the students brought in what they had so far.  All the different varieties.


Maybe this month I can try and get the block done ahead of schedule instead of last minute.

Wednesday, 27 May 2015

Drunkards path quilt

On the Monday of the May long weekend I was working on finishing the 3D pinwheel quilt.  I had all the borders picked out.  As I worked on it, I was using my Drunkards path quilt pieces as my leader/enders.

The drunkards path quilt I am embarrassed to say was started back on September of 2004.  This was 1 1/2 years after I started to quilt.  The reason that it got put aside was, at that time my experience level was not up for this one.  Curves are a bit challenging.  I did take it out about a year later and tried again, but I just didn't have the patience for the the small curves.

Now many years later I decide that I want this quilt done.  I like this pattern and the soft type fabrics I am using.  It feels like a summer or spring quilt.  I took the pieces out again and thought to myself that, I can do this, I can!


So, in between attaching the borders to the 3D pinwheel quilt, I worked on these pieces.  Just in doing the borders I was able to get 12 more small blocks done.  That's not bad.  And because it was done between other sewing I didn't even notice how quickly they were getting done.

I think I am going to keep the pieces beside my machine all the time and see how far I can get on this.  


So far, I only have two full blocks completed, but I do have enough small blocks to make approximately another 4-5 blocks.  The above picture is the block layout.  This block makes a diagonal chain going across the quilt, which ends up looking like a grid, only wonky.  The wonky part is the name of the layout the Drunkards path.

Tuesday, 26 May 2015

The top of the 3D pinwheels quilt is done

The top of the 3D pinwheels quilt is done!!!  Move it on up the list!  My little man did a good job holding up the quilt even with the wind blowing.


I finally committed to an outer border.  I think the colours are a little brighter than they really are in real life.  It was very bright outside when I took the picture.  Maybe that had something to do with it. After I quilt it I will take the pictures inside to see if it makes a difference.

Up close it looks great with the little striped border and the greens are bit brighter.  This was my first 3D pinwheel quilt.  The 3D affect is achieved by making prairie points and sewing them to a block, and attach the blocks together to make the pinwheels.  They are a little more involved but soooooo cute.

I would make this quilt again.  I can see it done up in pretty girl colours or even in primary colours.

You will have to stay tuned for the final picture, quilted and bound when I get that done.  Should be too long as her baby shower is in July and I don't want to leave this for the last minute.

Monday, 25 May 2015

My layout of the Stashbuster's Ugly Sunshine quilt

As I mentioned in my last post, there are endless options for layouts.  You just have to use your imagination.  A lot of people did a simple sashing and borders and let their blocks stand up on their own.  Others did different things.  I thought they were all very nice, in all their variations.

This is my layout of the Stashbuster's Ugly Sunshine quilt.  The quilt is king size.  As I have also mentioned in previous posts, that I like stars.  I wanted to incorporate a star in the quilt to tie all the blocks together.  The star turned out to be a plus, because it allowed me to put some blocks on point and others straight.

When I tried to put the blocks together this way I realized that the on point blocks would be too small for the corners to match the straight blocks, so I had to come up with a solution for this.  My solution was to frame them on two sides to make them big enough.  This created a secondary pattern by creating a border, also on point, that framed the whole thing.  It really made things stand out.

The colours I used for the quilt were selected because I had my nephew in mind for this quilt.  His favourite colour is orange, which is why I did the star in that colour and also why I chose the blue background.  Unfortunately, I was told later that I can't give it to my nephew, because the block fabrics have flowers.  They are thought to be too feminine.


So, I have had this quilt top done for a long time.  It just sits there waiting to be quilted.  I even have the backing and batting waiting with it.  Two things are stopping me from getting this quilt done.  One is that now the quilt does not have a purpose, no one to appreciate it.  Secondly, I wanted to quilt this with numerous small fill in quilting and I never felt my experience in this technic was ever good enough.

I am slowly building my confidence in my quilting using this technic, but I still feel the quilt needs to have a purpose.  So, it sits and waits....for someday.

Sunday, 24 May 2015

Block #9 - Stashbuster's Ugly Sunshine BOM quilt

Block #9.  This is the final block.  After completing all the blocks, you will have enough to make a fair size quilt. With each block measuring 12" square, even if sewn together, side by side, the quilt would be 36" square.  Once you start adding sashing and borders it would be somewhere around 60" square.  Or you could do the squares on a diagonal.

There is always the alternating plain square, where you lay it out in one block, plain, block, the next row one plain, block, plain and repeat once more and end with the first sequence.  This will leave you an extra block that you could use for a pillow.

The options of layouts are endless. Let your imagination wonder.


So this is the last block, what are you going to do with it?  This block as you will see from the one I made, will look very different depending on the placement of your colours or where you put your lights and darks.

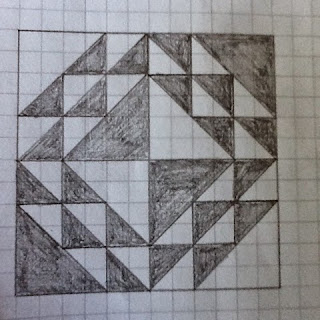
As I've told you before, I like stars.  With the colour placement that I used, I was able to emphasize the second outer star, more than is apparent from the black and white draft above.  I like my version of colours because it also emphasizes the diagonal lines.  These diagonal lines are great for making quilts because they usually create a secondary pattern that runs diagonally through the whole quilt. Somewhat of a grid and this grid adds to the texture and keeps your eyes moving across a quilt.


Well, I hope you enjoyed my blocks and hopefully have joined in to make your own.  Stay tuned for tomorrow for the reveal of my Stashbuster's Ugly Sunshine BOM quilt top.

Not quilt related, I thought I would share with you what I have been up to these past two weekends.  Over time the grade of your house needs to be fixed. For my home the walkways had all sunk in and tilted toward the house.  The grade next to the house actually sunk in a little over 4".  That is big when you think of all the water that is directed to the house and looks for a place to go.

What I did to fix this is install the 6" cement curbs along the property line along the garage side.  I added the landscape fabric and limestone to level things off, on a slight tilt away from the house.  For now there is a 1 1/2" gap to the top of the curb, but later we will be laying interlocking stones to complete the walkways.  It may be difficult to see but the curb even goes behind the garden.


By doing the walkways I am also creating the shapes of my flower gardens.  In the forefront of the picture is one garden that was created to stop the view from the street (once the bushes grow and fill in), and create a sense of walking through a garden before entering into the backyard.

What I will be working on today is trying to clean up the other side of this path.  The garden here is going to be on a diagonal to turn the pathway back in the direction of the yard.  This I have decided is going to be my butterfly garden, with butterfly bushes and different butterfly loving flowers. It doesn't look very big, but it is 6' x 6' along the house and will be big enough to plant.


I quite for a bit.  I need to still finalize what kind of stone I want to use to retain the gardens from the walkways.  At least for now it will be cleaned up some.  When I do decide what type of stone, I will pull out the temporary bricks and finish it off.

Saturday, 23 May 2015

Block #8 - Stashbuster's Ugly Sunshine BOM quilt

Block number 8.  This block reminds me of a bears paw block, but a bit fancier.  I like blocks that look like stars. The strip that runs through the block, depending on how you layout the block, can become a secondary pattern.  This block on its own can make a striking quilt when the block is repeated.


This is what I did with the block.  The light around the perimeter I left it as light by using my yellow fabric.  The lights within the block I filled them with colour.  I like the strip that runs through the block, so I wanted it to stand out a bit and decided to use my dark portions of my orange/yellow fabric.

This block only has a touch of the purple, right in the centre.  If I were to choose to make a quilt with just this block, I would take that purple centre and use the same colour to do the cornerstones of the sashing that I would put around the block and get that secondary pattern going.


As I said earlier I like blocks that have stars in them.  To make the star portion stand out I decided to use the main fabric, the black fabric. Though doing the second set of points in the blue helped to make that stand out a bit too.

Friday, 22 May 2015

Block #7 - Stashbuster's Ugly Sunshine BOM quilt

Bock #7.  This block is really four identical blocks put together to make a larger block.  The blocks are all the same, and the layout is every other block is rotated a half turn.  I've even seen this one block made up into a full size quilt.  The quilt I did see of this block was all red and white.  It was beautiful.  The person made each quarter, one red and one white/cream colour, and made many different blocks each with their own white and reds.


For me because there were so many choices of colour placement, I found this block the hardest.  Even now when I look at it I still think at the ways I could have done it.  In the end I did settle for this layout.  I feel in this layout that I short changed the black main fabric, but it is what it is.


Guess what?  After this block is done there are only two more to go.  Amazing how quickly it goes.

Thursday, 21 May 2015

Block #6 - Stashbuster's Ugly Sunshine BOM quilt

We are at block #6.  That is 2/3 of the way done.  If you are playing along, pat yourself on the back. Your over the half way point and heading to the finish line.  Way to go!

This next block is a pretty star.  I like the fact that it is different than the others.  


For my version, I again disregarded the light and dark.  I went with colour placement instead.  I did the star in what has become my main two fabrics, the blue and green, and I found a spot for each of the other fabric colours.


I think it is a cheerful block.  I think that has more to do with the fabric chooses.  This block could also look romantic if your using the more subdued colours or the soft pastels.  What ever your choices, if you are being consistent in each of your blocks, by now you are probable seeing how well the blocks are meshing.  Even though they are all different they still match and go together.

So, what are you going to do with this one?  Go ahead, play around with it.

Wednesday, 20 May 2015

Block #5 - Stashbuster's Ugly Sunshine BOM quilt

We are now on block #5.  This block consists of eight flying geese, four half square triangles and a square in a square. My apologies for the error on the draft picture, I just realized I forgot the centre section. Please refer to my coloured picture for the details, as I am unable to correct it at this time.  This is a simple enough block, but could be a bit of a challenge for a beginner.  Just take your time and pay attention to your 1/4" seam allowance.


On this block I went with the dominant colours as green and blue, again.  I just like how they like good together.  The two colours compliment each other.  I added a small dose of the purple and orange and finished it off with the yellow and main fabric.


Looking at the picture just now, I realize a completely different way to colour this block.  I am seeing the first flying geese close to the centre as another square in a square.  You could do those points all the same fabric to emphasize them, instead of the double flying geese.

Any which way you do it, it is your choice.  Experiment with lights and darks or colours.

Tuesday, 19 May 2015

Block #4 - Stashbuster's Ugly Sunshine BOM quilt

This next block is pretty.  There are so many pieces which means there are so many ways you can do the block.  It was amazing what came out of the group of Stashbusters. They were all so different, not only from colours and the different materials people used, but also the placement of dark and light.  Some of the blocks you had to look twice to see that it was in fact the same block.


For me, I decided to break it down to colour.  I was liking the emphases on the blue and green, so I continued that here.  In some spots I disregarded the light and dark placement, just to get the right proportion of my coloured fabrics into the block.  Because my main fabric is the darkest, where ever I put it is where the block will stand out the most.  In my case the outer chevrons.  


So now it's your turn.  What are you going to do?

Monday, 18 May 2015

Block #3 - Stashbuster's Ugly Sunshine BOM quilt

Block number three is five squares across by five squares down. Or you could treat it like a 4-patch with sashing in between.  Colour options are many and depending on were you choose to place your dark fabric, it could change the look of the block.


In my case in the end, I disregarded the light and dark parts of the block and went with colour.  I started out with all the light sections in my yellow fabric.  I was going to do one of my colours each for each of the corners.  But that seemed to break up the block.  I felt it was disconnected. So I decided to bring the block together with unifying the corner blocks with the blue and green only.  That left the centre cross and middle square for my other two colours.  I automatically put the purple fabric in the cross squares to make that stand out and the orange in the middle.

Throughout all this time of playing with my bits and pieces, I had forgotten to use my main fabric.  Where to put it...where to put it....hmmm.  The problem was that I liked the block the way it was.  But, I was determined to follow the rules.  Initially it didn't come to me, because I was stuck on the diagram and the placement of the dark and light sections.  Later, I thought to myself that I really only had a couple of places to put the main fabric.  In the light sections either in the middle parts or the outer parts.  I went with the inner parts.  However, that caused me to have to rearrange the purple and orange, as I felt the the middle was too dark in comparison to the rest of the block.


In the end I liked this new version more than my initial layout.  Which goes to show you that good things can come out of dilemmas of challenges.  You just have to be open enough to try different things.  That would go for things in life as well.  My block looks different than the diagram above, just by changing where the lights and darks go.  So, take your time and let the process evolve.  Try this and that.  When you have the right layout for your own fabrics the block will speak to you.  Have some fun!

Sunday, 17 May 2015

Block #2 - Stashbuster's Ugly Sunshine BOM quilt

I guess I should tell you that my post may say block #2, however I do not know which order the blocks were in.  It has been a long time since I did this and it was all online.  Once I printing up the pattern and made the block, I discarded the paper.

This next block was fairly easy.  If you break it down it is actually the one block repeated four times.  When you decide your colour placement you have many choices.  I saw some use the main fabric in the dark sections and their yellow for the light, some others treated the four sections differently and I believe I even saw someone do hers completely scrappy with all different darks in the dark sections and all different lights in the light sections.  The variety was very nice.

Now it's your turn.  What do you want to do with this block.


For me, this is what I decided to do.  My additional rule for myself was to incorporate each fabric I had into each block.  You don't have to do this, but I just wanted to.

As I had four coloured fabrics outside of my main fabric and the yellow, I decided to break my large block into four sections.  One section designated for each colour.  I wasn't very creative on this block.  The only change I did was the lights down the centre of the block.  I turned it into dark in order to get my main fabric into the block.


I have to tell you though that even though I love scrappy quilts, during the time that I was making these BOM blocks back in 2009, I was still controlling my scrappy quilts.  My brain needed the organization of everything in order and it its place.  Since this time I have learned to ease up some.

I will leave you with that.  Hope you decide to join in and make your own quilt.

Saturday, 16 May 2015

Block #1 - Stashbuster's Ugly Sunshine BOM quilt

This was my first block that I chose from the Stahbuster's Ugly Sunshine BOM challenge.  Unfortunately, I do not have a copy of both blocks that were offered each month.  For that you will need to become a member of the Yahoo Stashbuster's group.  They are quite a group. Very motivating.  Everyone rooting each other on.  Check them out and decide for yourself.

The draft of this block was pretty much what you got given, in grey and white shading.  That was good and bad.  Good because you were not persuaded by a specific layout.  You had to chose what colours you wanted to put where.  For some people it is difficult to see past the colours if they are provided to you.  Unfortunately, this can also a bad thing, because some people find it difficult to see the potential of a black and white drawing.

All I have to say to this is, use your imagination.  It is not a contest.  Your goal is to make a block, using the fabric that you have, that is pleasing to your own eyes.  I order for it to all coordinate in a whole quilt, I would suggest that you find a place to put each of your colours in each and every block.  Even if it only plays a small roll.  The placement and amount of any particular colour may vary from each block, but try and put each colour somewhere in each block.


The first thing you will want to do is take the drawing above and decide whether you want to do it with two fabrics plus your yellow or if you want to do it multi coloured.  If you plan to do it two fabrics the layout is pretty much set out for you, but you can still vary it up.  If instead you want to do it multi coloured, take away the shading and start from scratch.  Decide if the same shapes will have the same colours or not.  The choses are many.  This is where you can take your time and play.

This is how my block turned out.  Do you like it?


When I look at a draft, I try to think of what parts of the block that I would like to stand out.  For those spots I will either use a dark or a bright fabric, to draw the eye.  In this block what stands out the most for me is first the star in the middle that like more like a pinwheel, because the second fabric I chose blends I a little with the yellow background.  And secondly is the blue box that surrounds the star.

Your block my be different. Play around with it.  Place your colours in different spots and see what arrangement works best for you fabric.  The placement of light and dark fabrics has a huge impact on how you block will look.  Don't worry though, if you don't like the fist one, just make another.  You can always use the rejected block somewhere else.

Most of all, the thing to remember is to let go and have some fun.

Friday, 15 May 2015

Intro to the Stashbuster's Ugly Sunshine BOM mystery quilt

Work has been crazy these days and it doesn't look like it will be letting up any time soon.  I haven't been able to do much quilting and I hate not being able to post something for you my readers.  My apologies for stretching these posts out, but one has to do what one has to do.  I will try and make it interesting for you.

While I was racking my brain trying to figure out what I can post about, I remembered that I didn't show you the quilt tops that I have, that are just waiting their turn to be quilted.  For the most part they are still not quilted because they currently do not have a purpose or I haven't figured out yet how I want to quilt them.

I've decided to share this quilt with you, but beware, this quilt will be shown to you through numerous posts.  This quilt was a block of the month (BOM) type quilt.  I, as well as many Stashbuster's members, started this BOM challenge back in Feb/2009.  Yes, it was a long time ago, but after finishing the blocks, it took me some time to figure out the layout that I wanted to set the blocks in.  My top is now done.

The whole process was certainly something different than what I was used to, but I enjoyed the defined rules/parameters and the creative side that stretched my comfort zone and had me thinking outside the box. I really had fun doing it.

The name of the quilt is kind of misleading.  There was nothing "ugly" about any of the quilts that came out of this challenge.  The challenge was started by a moderator to do a few things.  One, was to use up you stash, hence the group name "Stashbusters".  Two, was to be creative in a group all across Canada with everyone doing the same thing, but different.  Three, was to make a charity quilt and spread some cheer to someone in need, hence the word "sunshine" in the title.  Four, was to challenge use to go outside the box, by using a piece of fabric that you may not have used, because you either think it is "ugly" or you find it difficult to use ii in an actual quilt.

For me it was using something that I found difficult to use in a quilt.  You needed to have approx. 1-2 meters and you needed to use it in each block. This was my fabric. It kind of looks like a stained glass panel with the black pains holding the stain glass together.


No matter how often I tried to put this fabric in a quilt, it just didn't fit.  Often it stood out too much comparison to the other fabrics.  It just didn't play nicely.

The second rule for the blocks was that you had to have yellow in each block.  Yellow represented the "sunshine" in the title. You could use different yellows in each block if you wished or one yellow throughout.  I chose this one yellow to go in all of my blocks.  It's a bit pale and helps to tone things down a little.


From there you were on your own to pick a couple of coordinating fabrics to go with your primary "ugly" fabric.  The third rule was that all the fabrics had to come from your stash.  You were not allowed to purchase any fabric to make these blocks.  Again, this was the purpose of the group called Stashbusters.

As this was to be a give away quilt, I decided to make it cheerful.  I pulled fabric from my stash that had the colours in the main fabric.  This first one I think was the last fabric I chose, just to file in the gap of the others.  It was a bit more of a medium fabric.  It was a deeper yellow with lots of orange and bits of pink.


In the main fabric it has the theme if rainbow colours.  There is orange, yellow, blue, green and purple, all with a black background.  I chose this next fabric because of it's purplish background that matches the purple in the main fabric and it has some of the orange and yellow with a bit of green.


I chose this blue.  It is difficult to see but this blue has shading that goes from light to darker all across the fabric.  You can notice it more in the individual blocks.


Lastly, I chose this green.  Another bright colour.  These fabrics by themselves do not stand out as being wow fabric, but they do end up going very well together.  So much so, that I was surprised to see the blocks come together.  I really got interested and looked forward to seeing the next block of the month.


The way that it went was that the moderator of this challenge would each month send out two blocks to choose from, one was sometimes easier than the other for different skill levels or sometimes she may have chosen an appliqué block for those that wanted to learn different things.  You had to chose one of the blocks and make it.  Each block had to have your theme fabric and yellow in it.  But what you did with the block was for you to use your imagination.

The blocks all measured 12".  In the end, by October you would have nine completed blocks.  That is where it ended.  From there, everyone had to put the blocks together, however they chose.  Let me tell you, that many beautiful quilts came out of this challenge and not any two were alike.

So.....stay tuned.  I will show you in the following days which blocks I chose to do and how I chose my colour placement.  I will even make a draft of each block, just in case you would like to do one of your own.  It won't be a block of the month, but you can still play with it and use your own fabrics.  Maybe even get others involve so that you can all have some fun.

FYI.  All of the blocks used are part of the public domain.  There are no copy writes being broken in the making of these posts.  Feel free to share with your friends any or all parts of the blocks.

Wednesday, 13 May 2015

Planning the borders of the 3D Pinwheel quilt

I was able to finish sewing together the blocks to the 3D Pinwheel quilt.  I am now trying out some borders.  My daughter thinks the right side is too dark and I think the left side is too washed out.  I think we are both right, so this Saturday when I go for my Tiny Town appliqué class, I will be checking out some other options.


Just an FYI.  The true colours of the pinwheels are a bit brighter.  I feel if I take the pictures without natural lighting my iPad pictures seems to not be as good. But you get the picture. No pun intended.

Monday, 11 May 2015

Busy weekend

Yesturday was Mother's Day.  Hope everyone spent the day as they wished and enjoyed every minute of it.  I know I did.  It was busy, even with the rain.

I woke up early and had my tea while doing my Tiny Town block that is due this coming Saturday.  I did this until 9:00 am, when I decided I it was late enough in the morning to make noise outside.  I thought I would finish the curbs I was working on, but when I got outside I realized that I had to plant my tree.  Do you like it?  It is difficult to really see it on the tag.  It's a Eastern Redbud.  The picture is showing the tree limbs covered in small pink blooms.  The blooms are usually a light bright pink.


Before I got this one in the ground though I had to move some large bushes.  The back right hand corner is getting filled in.  Another bush and a few more perennials and it will be done.  If you can enlarge the picture you can see the dark green bush (the Yew) that I moved from another part of the garden.  The bush is currently 5' tall and will get to about 8'-10' tall when done, with a spread of 4'-5' wide.

Where the yew was I had a dwarf burning bush.  I moved it about 4' out in front of the yew.  Currently there are two dwarf burning bushes.  I am going to add another late in the season, because where I am going to put it is where the bleeding heart is.  The bleeding heart is looking pretty right now, so I don't want to disturb it.

In front of all this I have my Japanese maple that I only planted last year.  Once this corner matures a bit, it will fill in nicely.  The rest of the surrounding area is still a work in progress.  I worked on this corner yesturday, because while I sat in my chair drinking my tea and doing some needle work, with the sliding door open enjoying the breeze, I was constantly drawn to look outside. The birds were coming and going, eating from the feeder or looking for worms in the grass.  It was so peaceful.  I would look around and tell myself that I had to work on the garden.  So I did.


Just before the rain really started and set in I managed to finish all the transplanting.  After taking a shower to clean up from all the dirt, I sat down in my chair to admire the work.  I am quite happy with it.  Needs a little more but the main bones of the corner are in.  Now we wait for time to do its thing and mature the trees and bushes.

I settled down to do some more appliqué.  This is what I have done now.  I have part of a house to do, a bird house and part of the heart topiary.  I'm getting there.


I had a very nice Mother's Day.  Between all the above, my daughter woke up at 6:00 am to give me happy wishes and her gift to me (she had to go to work for 7:00 am).  My son made me French toast for breakfast and gave me happy wishes and his gift to me.  I made a simple chicken soup for lunch and for afternoon snack my daughter came home from work with a maple pecan Danish, which she served with a tea.  What can be better than that.  I did all the things that I like to do while being treated like royalty.  Life is good!!!

Saturday, 9 May 2015

Nothing quilty to post about

Nothing quilty to post about today.  I haven't had much time this past week.  I was sick a few days, so nothing got done.  While on my last day in bed I wasn't well but not able to sleep, so my mind was racing.  This time it was about gardening.

I drew out some plans for my left side garden path and for my right side walkway that leads into a garden and sitting area.  This is what I came up with for the left garden path.  This side is not needed for utilitarian use just another way around the house.  I thought for this side I would do the whole thing in garden and have large stepping stones with maybe moss or a ground hugging ground cover between them, and just pack the space with flowers.  Maybe make it a destination with an arbor at the end of the path leading into the back yard.  


I will be putting three tall but slim trees between the houses, a couple of bushes and the rest perennials.  I am still planning things out at this point.  The following few pictures are going to be my inspiration.  Between the houses I have more space than this next picture, but it goes to show you that you can have a beautiful space even with minimal space.


This path is more free flow.  Like the effect of the ground cover between the stones.  Obviously I don't have this much space between the houses, but I just like the overall effect.  The anticipation of where the path is going to lead you to.  I want to try and achieve this, at the point of going around the corner of the house and into the backyard.


This next picture kind of does the same thing with the curved pathway.  All of the pictures are beautiful in their own way.  I am hoping to get some bits and pieces of all of them, in my small space.


Today was such a beautiful day out, that I decided to start the walkway leading to the backyard on the right side of the house.  This path has to be at least four feet wide as it will be the only way to get large things in or out of the back yard.  Got off to a late start with running around for all the supplies I needed, but I did get started.

I dug out a trench along the property line along the fence to put some lime stone and lay down my curb stones.  The curb stones will be there to contain the crushed stone and interlocking bricks for my path.  I ran into a problem, so had to call it a night while I went to get another drill bit to make the holes for the rebar.

Tomorrow is Mother's Day, so I may want to take the day for me, but we will see.  It is taking shape already, so I may not want to stop.

Monday, 4 May 2015

Tiny Town progress on block two

Yesturday was another beautiful day.  The sun was out, but not too hot.  I did some clean up in the garden, while my niece and her husband came over to use the BBQ and their kids horses around with my son.  I took a bit of time to check out all the different plants sprouting and the tulips in bloom.  Even some of the trees are in flower.  At this house, I only really started playing in the garden last year, so this year I am seeing the changes take shape.  It's nice to watch.

Before I got out into the garden I had my morning tea while working on my hand appliqué.  Block number two is due by May 16th.  Two weeks have passed and I have completed a building per week as was required to keep on top of it.  I even assembled the top half of the block.  You will have to ignore the purple hexagons.  I have my block on the design wall right below the floret row.

These buildings are a house and a barn.  Do you like my daisies in the window box.  I do.


This one is the bottom half of block two.  I have two weeks less one weekend left to go before the meeting, so I have to work on one building and one side decoration per week.  


This block is going to be colourful.  I like this block with the topiary and the bird house.  I really like the background of this one too!  The background was designed to appear like salvages sewn together.  There are the dot colour lines and the words.  In this case the words are not the designer and name of the pattern.  In this case the words are quilting related, like quilting forever, sew happy, 100% cotton, I run with scissors, I'm creative...you can't expect me to be neat too, and make do and mend.  It's cute!