Sunday 15 July 2018

Beige swirly HST quilt

On Tuesday, my daughter underwent major oral surgery.  We had a few small setbacks, but now she is settling down and is on the mend.  This surgery has a recovery time of 6-8 weeks and full recovery at almost a full year.  What an ordeal, but my daughter is young and strong, so she is dealing well under the circumstances.

Yesturday afternoon was the first time I was able to take a break to disappear in my quilt room.  She was propped up on the recliner to watch a movie while her dad sat with her.  Later she came down to my room and spent a bit of time with me there, probably knowing that I needed the down time.

What did I do while I was in my quilt room?  Well, I went though my pictures to find the picture of a top that I thought looked good and would be a good option for half square triangles (HST).  I found this picture on Pinterest.  Unfortunately I do not know the source, so not able to give credit where credit is due.


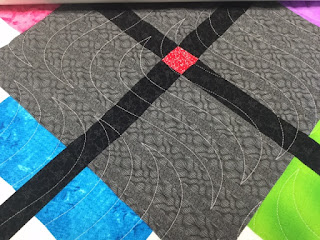
I like the pinwheel slightly off centre and the dark vanes shooting out from them, going around and around to fill the space.  Quite pretty.

My thoughts came back to this picture while I was cleaning out some containers and came across a box of HSTs.  These HSTs were given to me a while back.  The box contained hundreds of them.  The size quilt I decided to do requires 252 and I still have at least another three times more that I could make.


To start off, I sorted the HSTs into groups of like colours and same patterns.  Above you can see I have the bright fabrics at the top and medium colours of a particular pattern on the left in the middle.  The stripes created their own pile and the next four piles are divided in same patterns, just different colour ways.


I am starting with the four bottom piles.  They all match with the large piece of beige fabric I had in my stash.  The print on the beige is a navy blue stippling pattern.  I trimmed all the triangles and cut out the beige.  Sixteen full length strips were needed to complete the one half of the squares for the 252 squares required.  There looking good.  I am liking this choice of fabric.

Sunday 8 July 2018

Finished quilting Mom's monkey quilt

This quilt was made for my second nieces little boy.  Her little girl got the fairies and her little boy gets monkeys.  He is a typical boy, actively climbing up on things and generally being a little monkey (pun intended, lol). 

My daughter again went online looking for images.  There were a lot of monkeys, however she had to keep in mind that these embroideries needed to be more simple to embroider and be young kid oriented.  Some have bananas and some are on branches.  They are all cute monkeys.
    
  
Here is a closeup of one of the dancing monkeys.  Mom used different colours for each of the monkeys.


For this quilt I used the popular pantograph call Nightlight.  This has swirls and stars.  The above picture shows the stars better.  Do you like the monkey fabric we found for the backing?  The above dancing monkey looks like he could be related to these ones. Lol


This one too I had to hold off show until it was gifted.  They were both gifted when we had the joint birthday BBQ on the Saturday.

Saturday 7 July 2018

Finished quilting Mom's fairy quilt

My mom started making each of her great grandkids a small lap sized quilt.  My eldest niece had her children first and each of them has a hand embroidered quilt.  Each quilt being of a different theme and colours.  These were made some time ago and I quilted them for her on my domestic sewing machine, as that is where I learned to quilt first.

My second niece started having babies.  She currently has two children.  The first is a boy and the second one is a girl.  Mom made these a little while ago.  Between her renovating, she slowly worked on the hand work.  One block at a time when she needed to sit for a while to rest her back.  This particular quilt was made for the girl (Rylee Marie).


We decided to look for fairy pictures and went with both fairies and princesses.   My daughter looked up the images online and my mom took it from there.  The handwork is so pretty.  Each of the blocks are different with different coloured dresses and hair.

Here is a closeup of one of the fairies.  Soooooo pretty with her ballet slippers.  I also like her friend the little butterfly.


For this quilt, I chose to use the Whole Lotta Love pantograph, with all the meandering hearts.


I like it and so does my mom.  On the top I used 60 wt thread so that the stitches would disappear in the embroidery.  There is a lot of texture, but it does not distract from my mom's handwork.

This quilt has been done for a while, but I needed to wait to show it until it was gifted.

Friday 6 July 2018

Completely freehand free motion quilting for a customer

This long time customer has been with me since I started out quilting for others.  She handed me this quilt and told me to do whatever I like.  Well......that was a loaded pistol.  Where to go with it was my worry.  This customer is a very traditional person of English decent.  

So far I've been sticking to traditional type designs like echo quilting, feathers and such.  But this time she gave me this quilt and told me to do anything I like.  She must have seen my eyes pop out, because she expanded and told me that she likes everything that I have done so far for her, for others and for myself, that she wants me to just do whatever inspires me.


This quilt will be going to one of her daughters, so my first thought was to do something fresh and a little more playful, but still keeping it simple.  I like how the Terry Twist adds an overall texture to the quilt and depending on the angle, sometimes it looks like windmills.  My customer saw curly flowers.

This is what I did for the honeycombs.  I saw a scalloped edging and when she saw it she thought of a peacock.  It's funny how people see things differently.  I like this simple quilting design.


Lastly, I chose to do close straight lines for the last row of the hexagons.  The effect looks like there is a border around the quilt.  The lines follow the contours of the hexagons.


This was a fun quilt to do.  It took me a while to do, but it was fun.  The worst part was doing the envelope type edging to finish off the quilt.  Cutting the zig zag shape for the backing, and trimming the batting level with the hexagons, to turn in the backing fabric and slip stitch the whole thing.  This took a very long time to do, but it was well worth it.  Binding would have taken away from the hexagon quilt feel.

All in all my customer loved it.  She was ecstatic and said it was going to be difficult to give this one away.  That comment alone made my day.  I've been quilting for others for a long time now, but still to this day I worry they won't like something that I've done.

Cheers to another successful quilting job!

Thursday 5 July 2018

Finished the Farmer's Wife quilt

This one is my version of the Farmer's Wife quilt.  I started this back in Nov/2011.  I set myself a task of doing one block a week for 52 weeks.  However, as usual life got in the way and this got put aside.  From time to time I would take it out to look at it, but I was never too keen on getting back into it.  I'd only do a couple of blocks here and there.

When I started the American Patchwork and Quilting UFO Challenge, I included this quilt.  I was tired of looking at it and thought if it was on the list, it would force me to finish it.  Initially, I couldn't understand why I lost interest in these blocks.  I went from looking forward to making this quilt to actually hating it.


I tried to figure out why I didn't like it anymore.  The initial layout is simple sashing between the blocks, so at one time I thought it was because I didn't like the layout, so I came up with a different layout.  I thought it might have been because all the different blocks were just too busy, so I adjusted the layout a bit more to separate the blocks with their own border.  

In the end, I realized that it was the colourway of the blocks that I didn't like.  It looked muddy, boring and blah, whereas I prefer cheerful, bright with colours instead.  


When this quilt came up in the challenge for April, I had debated abandoning it.  I posted about it on the Facebook group for the challenge and got numerous suggestions and encouragement.

I'd have to say that the one that really hit me was to stop where I am at and finish it.  What the person meant was, don't make anymore blocks, just stop making them and work with what I already had to complete it.  So back to the drawing board I went to redesign it one last time.  I was luck in that I had 24 blocks, a good number that divided up well across and down.

In my last draft I used the remaining fabrics to make the scrappy strip pieces to frame the blocks and sashed those.  In doing this I almost used up all my "ugly" to me muddy fabric.


I quilted edge to edge clam shells to keep it close to period.  I realize there are many who like the civil war type fabrics, however I can't say the same.  I don't mean any disrespect, but I found it torcher to work with these colours.

I am going to give this quilt away, so I will have to find someone who likes this colourway.  

Now I can actually call this done.  It's done!!!

Wednesday 4 July 2018

July's American Patchwork & Quilting UFO Challenge

July's American Patchwork & Quilting UFO Challenge number is 7.  For me number 7 is my Xmas/Solstice star quilt.  This is a previous mystery quilt designed by Bonnie Hunter.  You can now find this pattern in one of her books.

This quilt is made up of two types of blocks alternating throughout the quilt.  There is a star block and another block that has chevrons, a pinwheel and some half square variation units.  This picture is the second block.  I have all the smaller units done and have them kitted together, ready to assemble.


I am actually really far along on this quilt.  There is a very strong chance of actually finishing this quilt in July.  I have all the star blocks done and when I started I only had 24 of the alternating blocks to do, plus only one side of the red arrow blocks along the perimeter.  Yay!


This is going to be my bed quilt for Christmas for hubby and I.  At this rate I should have it sewn, quilted and bond by the time Christmas rolls around.  Another YAY!!!

Tuesday 3 July 2018

Borders for the French braid star quilt and a couple of garden pictures

Well....this morning I've already been busy.  I finished my laundry room tiling on the backsplash.  With all the setting up and cutting it only took me 2 hours.  Yay!  First step done.  Now I have to wait until tomorrow to do the grouting.  It looks kind of funny with all those green spacers.  Now I can get back to what I really want to be doing......quilting.


This next picture is not the greatest, as the lighting at 10:30 pm last night was not so bright.  The true colours of the fabric are more bright.  Yesturday I spent the day straightening up my quilt room.  Putting things away, ironing the scraps and fat quarters that I washed, generally taking care of loose ends that made my room look like the July 1st Canada day firecrackers exploded in my room. Lol.  


The creative process sometimes gets messy and out of hand and so I find myself, from time to time, culling things.

While I was doing this I was also trying to empty the laptop.  It's old and needs to be retired.  That took me most of the day as it kept crashing with everything I tried to do.  So while it would reboot, I trimmed blocks, removed the paper from my mini blocks or anything else that I could fit in to do.

Once all those things were done, I thought I would finish the borders to the French braid star quilt.  There were three sets of borders to add.  Borders are another step that I tend to stall on.  I don't care too much for getting down on the floor to measure them and pin each one.  Three borders, times four sides, means crawling on the floor a minimum of twelve times. Up and down, up and down.  But I can now say they are done!!!  Yay!!!

So now it goes in the lineup for quilting.  I have some client quilts to do first, and I think I will put this one in front of all the other quilts that I have of my own waiting to be quilted.


I thought I would also share some pictures from the garden.  The one above is my idea of a piece of garden art.  This is a tribute to my dad.  He is the one who gave me this watering can.  I used it constantly.  Unfortunately, the water spout has weakened and it can no longer be used for it's intended use.  So I added some holes on the bottom, added rocks, potting mix and the flowers.  I like it.

I have these deep purple flowers in full bloom as those little red ones are finishing their bloom.  Hostas are always a welcome shade if green for all season greenery and come another couple of weeks the bee balm will start to show their deep pink unique shaped flowers.


Enjoy the beautiful weather!

Monday 2 July 2018

Finished quilting the argyle quilt

I finished this quilt last year in December.  Since, it just sat there patiently waiting for me to get the binding on.  A few months ago I got the binding attached by machine and again it waited patiently for me to tack it down by hand.  Later, about a month ago I had the time to sit and do the binding by hand.  It took me until yesturday to finally take a picture of the finished quilt to share it here on the blog.

There are a few stages that my quilts will be held up, but the binding for me has got to be the hardest to get done.  I have this mentality that once the quilt is quilted and trimmed that it is done.  I don't know why, but there you have it.  I stock pile all the quilts at this stage and end up doing a marathon of bindings.


I designed this quilt myself.  I wanted something bright, but more appropriate for a teen.  I like the way it turned out.  It reminds me of argyle socks, hence the name of the quilt.


I quilted this quilt with a pantograph called Time Warp from Urban Elementz.  Essentially it is a bunch of waves clumped together to make a larger pattern.

I think the next time I do this pattern I am going to set it more narrow horizontally.  This size is more affordable and still looks nice, but I saw this recently with the spacing only about 1/2" and it takes on a whole new look.  It looks more modern and the shape of the single motif stands out more.

Sunday 1 July 2018

Customer's hexagon quilt

I am working on a customer quilt.  She made the hexagon quilt all by hand.  These honeycombs are bigger than a grandmother's flower garden by an extra row of coloured hexagons.  This quilt has four rows of three for 12 honeycombs.  This is the largest quilt this customer has made thus far.  The last one was the same colour way and layout, but only six honeycombs.


The last one was quilted the traditional way with a very large feathered wreath in each honeycomb and echo quilting in each white hexagon.  For this one she is giving me free range to do whatever I want.  

This custom is in the small quilting bee group that I used to belong to, so she has seen many of my own quilts and the quilting I did for the other members of the group.  When she handed me this quilt, she just said she likes everything that I do, so go ahead and do whatever I want.

That statement opened up a lot of possibilities.  I knew this quilt was eventually going to one of her daughters, so instead of traditional, I thought I would go a bit more modern, but still not too funky.


For the white space, I decided to do an all over Terry Twist design.  It looks good and it is much faster than individual echoes.  Depending on the angle you look at it, it looks like a three spoked windmills.  This design is a little more playful.  I think her daughter is going to like it.

Once I am done the white, I will go back and do my second pass to finish the honeycombs.  For them I've decided to do a design that I saw on Pinterest.  The middle portion is all one continuous design, and the outer design is another continuous design.  The outer edge design acts like a scalloped border for the centre and in 3D looks very pretty.


Update:  The finished pictures will follow shortly as I have started the honeycombs.

Have a great weekend everyone and HAPPY CANADA DAY!!!