Friday, 30 June 2017

Xmas/Solstice star quilt half way completed

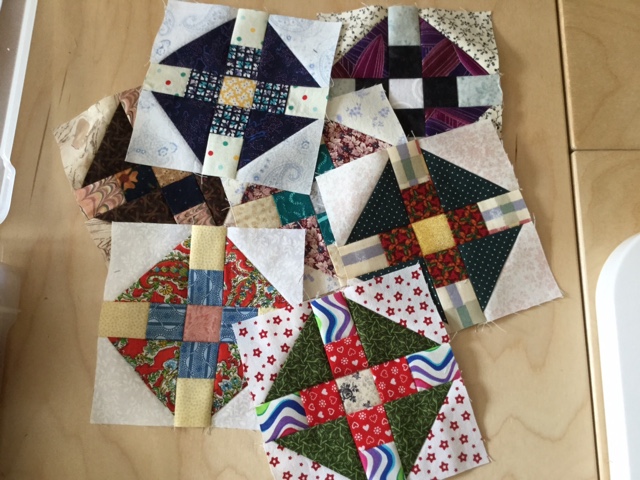
A great big hurray!!!  A little while ago, I finished all of these blocks for the Xmas/Solstice star quilt.  These are the star potion and make up half the blocks needed to complete the quilt.


Now I need to work on the alternating blocks.  They are a bit more complicated.  I have various parts done, but still some more to go.  I will add the parts to the leader/ender tray, but again I first have to wait to finish up the stuff for the show.  Maybe this long weekend I can slip in some time to just sew.


Non quilt related.  I will leave you with a picture of a piece in my garden.  I've had this little girl for many years.  The basket is so small though, maybe 5", that nothing would stay alive for long.  Well, I finally found the answer.  Not only did this chick & hen plant live, but it also survived over the winter, as is being left outdoors. This year it even started making babies.  How cute is that?

I hope everyone enjoys their long weekend.  Happy Canada day!!!  Keep safe.

Thursday, 29 June 2017

What's on the design wall now (June/2017)

As June is shortly coming to a close, I thought I would take a look at what progress I've made.

I've been working away at my purple stars blocks.  They are all assembled into a top.  I've even cut the strips for the first border.  It shouldn't take too long, once I get a chance to sew.

So now, I am working on the blocks for my Canada's 150th birthday.  This quilt is called Canadian Northern Wind.  The top row blocks are completed, plus a bunch more.  


Behind these blocks you still see bits and pieces of my hexagon quilt.  That one is still put aside for now.  At the top left hand corner you can just see the edges of my bear paw block.  I put that up there, because when it was front and centre, of my line of vision, while I sewed on my machine, I kept thinking about working on it, but it is not on my list yet, to work on.  So, I put it out of the way, until I can get back to it.

Lastly on the top right hand corner I have my monkey wrench blocks.  I have to cut some more pieces for these blocks, for my leader/ender tray.  This one is allowed to stay on the wall.

While I work away at the Canadian Northwind Blocks, I can get four lines of sewing on a leader/ender, so I will be making a lot of progress on them........however, that is when I get a chance to sew them.

For now, the rush is on to work on everything that will be in the show come October.  That means I have to finish the binding on two large double/queen size quilts, put the sleeves on five large quilts and one wall hanging, and make seven labels for the quilts. Plus finish borders and quilting yet another queen size quilt, including the sleeve and label.

So....for a bit I will be busy getting it together.  As it is a long list, l am stopping everything else until they are done or for as long as I can.

Wish me luck.

Sunday, 25 June 2017

One more Dresden plate, now there are six left to do

Things are going slow around here lately.  I am in the process of prepping my quilts for the guild quilt show coming up in October.  It is a little ways off, but I have to make and attach hanging selves to all six quilts and one wall hanging, plus each one also needs to have a label.

So, today about the only thing I am going to have time for is getting this label done.  I am hoping to also have time to attach it to the quilt itself.  We shall see.  I have to leave the house by 5:00 pm to head toward Oshawa, so that is cutting my time short.


I am excited today in anticipation of my outing.  I am going to see Angela Walters live at Whirls and Swirls.  She has been here a few days giving classes on quilting.  Tonight she is having a trunk show. I feel like a little kid, giddy with excitement.  Angel is very inspirational and easy going.

I will close off this post with this recently completed Dresden plate block.  Now I am down to six more blocks left to do.  They are slow in the making, but slow and steady did win the race for the turtle.....  I am not worried about speed on this quilt.  I am just enjoying the process.  Though these are currently taking the back seat for all the labels and sleeves that I need to work on for the show, I will eventually get back to them.


Enjoy your day,.......I know I will. :)

Saturday, 24 June 2017

Sewing machine wall hanging

I finished my vintage sewing machine wall hanging a while ago and forgot to post about it.  I like how it turned out.  I will be entering this piece into the guild quilt show in October.

This was a gifted kit from one of the quilting bee members' husband, who gifted it to me for being a part of finishing the quilt his wife was last working on before she passed away. I quilted the quilt for him and his family to enjoy.  One member finished up the borders, I quilted it and another member will attached the binding.  Our way of saying good bye, and honouring our friend.

This wall hanging is 18" X 42".  The pattern is called Comfort by Barbara Cherniwchan of Coach House Designs.


For the background I chose to quilt in a basket weave style, using each block for changing directions.  The cream block lines go up and down vertically and the floral block lines go side to side horizontally.  The lines are really close together which helps a lot in making the individual applique pieces pop up.  Looks kind of cool.  I just can't help myself and have to run my hands across the texture every time I look at this.


Here is a closer look, so you can see the quilting a bit better.  I only wanted to do a few designs on the applique pieces themselves, as I didn't want to flatten them out.


Lastly, here is a picture on the diagonal. It is very difficult to get the quilting to show up on black, especially when using blending black thread.  I found though that on a diagonal with the only light being that from the window, casting shadows across the quilt, was the best way to get the whole effect of the quilting.  This picture also shows the binding on.


In person in full light you can see all the 3D affect the two layers of batting have on the wall hanging, however you just can't get the same in a straight on picture.  Hopefully you can excuse the quality of the picture, as I am not a professional photographer, I wouldn't  even call myself a novice.  But I think it is good enough to see the texture in the piece.

Enjoy the beautiful sunshine!

Thursday, 22 June 2017

Monkeying around

I have been monkeying around (pun intended).  With my monkey wrench blocks.  Lol.  


I did two of them while I was making up the purple star blocks.  Later, I made two more.


I was so excited by the variety of the blocks that the next day, I made all the blocks I had cut sitting beside my machine in the leader/ender box.


This is where I am at with it.  Look at all that variety.  I am loving making these as much as I enjoyed making the bow tie blocks and watching them grow over time.  I still have many more to make to get this to a queen size quilt, but there is no rush.  I am going to have to get my scraps out first, to cut up the various pieces I need.  I enjoy looking for and finding odd bits and pieces.  


This is definitely a fun quilt to make.  I hope you enjoy watching the quilt grow as much as I do.

Monday, 19 June 2017

Finished the Dresden plate quilt

I little while back, I finished the vintage Dresden plate quilt.  This was the last of four quilts my cousin Lise and her husband Jim asked me to help them finish.  They were tops or blocks that needed to be finished into quilts.  They belongs to Jim's grandmother and his mother.  This particular one, the Dresden plates were made by Jim's mother.  I put all the blocks together and quilted the quilt.

It took me this long to post about it, because I was so excited to have it done and share it with my cousin and her husband, that I forgot to take a picture of the top.  Thanks Lise for the picture.  It looks pretty on the bed.


Here are a few close up pictures.  I designed this quilting design from various different sources and altered it to meet the space and cornerstone that is the centre of the motif.  The second picture below shows the pattern a bit better as the chalk is still present.


This one is a close up of the two borders.  After I finished the quilting of the cables on the last border, I cut back the border to follow the feathered motif and created a scalloped finished edge.  If you go up to the first picture you can see the scalloped edge.


I was very happy with the quilting on this one.  I continue to learn different things as I go.  All the fancier stitching though was done on my domestic machine, as that is where I am most comfortable when doing more intricate designs.

I am so happy.  It's always scary when you're told to do what ever you think is best.  There is always the chance that you will love it, but the recipient not so much.  Not in this case though.  My cousin and her husband love it.

Sunday, 18 June 2017

New addition to my fleet

Yesterday morning my husband and I set out for a trip to pick up my refurbished treadle machine that belonged initially to my Great-grandmother, before it was handed down to my grandmother, and on to my mother, and finally down to me.  I had them clean it up and refinish the cabinet, as it was showing more than the usual wear.  Now it is sitting proudly in my livingroom.

While we were there I also test drove a Singers 201K Blue eye. As you can see from the picture below.  It came home with me.  This babe runs so smoothly with a gentle quiet hum, and the stitches are so, so beautiful.  This machine was considered the Cadillac model of machines in that time period, and still very sought after now, by anyone who knows machines.

The machine came with all the original parts and the manual, which are all still in good condition.  What's great about is machine too, is that it takes regular needles that you can still get and the regular class 66 bobbins, again that you can still get.


I've set the machine in my cabinet and even made myself a matching insert to surround the machine on two sides for an extended flat surface.  It almost looks like I bought my cabinet this way.  Now I only have to seal the surface with a wax finish to match my cabinet.

I am so excited to get some real sewing done on this babe.  After the pictures were taken, I took some time to mark my quarter inch seam with a guide, and sewed a couple of test squares.  She is ready to go!


I thought I would end the post with a picture of a pretty peony from my garden.  This is the first for my garden since I moved here five years ago.  I love the pink colour.


The back side of the flower is deeper and lightens as you go into the centre where it is the pales pink with a ting of yellow.  This year I have one singular flower from a total of three plants.  The other two plants are magenta and white.  With this one flower we have hope that the others we eventually bloom too.

Enjoy your weekend everyone.