Wednesday, 7 February 2018

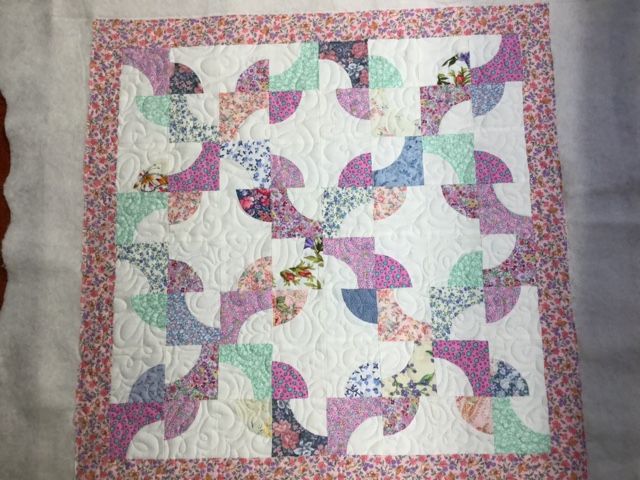
Finished quilting the old maid's puzzle NICU quilt

I am still doing some odds and ends.  Nothing much to post about, so I thought I would share this cute little NICU quilt I finished back during the Christmas holidays.  These units were leftovers from a Drunkard's path quilt I am making.  I have all the blocks sorted into sets waiting to be assembled.

With the left overs, I was able to make this little NICU quilt with more units to spare.
  

I used this quilt to practice a new to me quilting pattern.  Not sure what it is called, but it reminds me of a lightbulb with clouds.  To quilt it, you start off with a paisley design, and you echo it.  After you've done this you would make loops like small written "e" all the way around the paisley, you echo that.  It looks a bit like a flower.  Hard to describe, but enlarge the picture and you will see what I mean.  It is not difficult to execute and makes for a nice all over design.


The colours are soft and the backing is the same as the border.  This little quilt is trimmed, binding made and sewn on by machine, now just waiting for me to tack down the binding by hand and add the label.  I seem to always stall at this stage.  I am hoping my UFO challenge list will help with is.

Friday, 2 February 2018

Finished quilting the circus panel quilt

This was a black and white panel, that was given to me by a friend, to make up for a charity quilt.  I felt the back and white was just not interesting enough.  So one night, I sat down with a big box of Crayola wax crayons and started to colour.

If you are going to do this, make sure that once you are done colouring, that you iron it, to melt the wax to the fabric.  You'll also want to make sure that you use a scrap piece of fabric between the crayon and your iron before you start to melt the wax.


It turned out nice.  I like it much better.  It's more cheerful.  After all it is for a child.  I quilted this during my Christmas holidays and just haven't had the time yet to trim it to size and put the binding on.  I am going to use a solid black for the binding to match the thick black lines of the pictures.  This quilt measures approx. 30" X 40" and I quilted it using a pantograph pattern called Nightlight.


I though I would also throw in this next picture of my progress on the embroidery for the quilt, To Grandmother's House We Go.  I did a fair amount on it this morning.  My eyes are not quite seeing straight after a full day on the computer for work, so I think I will call it done for today.


You'll have to excuse my shadow through the picture.  I didn't notice it until now, while I am writing up this post.  I have one more Christmas tree at the bottom left hand corner to do, and I will make my way to the middle of this panel to a house.

That will be for another day.

Thursday, 1 February 2018

February's American Patchwork & Quilting UFO challenge

The February's American Patchwork & Quilting UFO challenge number is #9.  For me that is my To Grandmother's House We Go.   I've shown this one recently.  The pattern is from Crabapple Hill, called Over the River and Through the Woods.  It finishes at 51.5" X 57.5".


Since my last post, this is where I left off.  I started the bottom embroidery panel, in the left hand corner.  I felt I'd gotten a fair amount done at the time.  Though when I think about the fact, that what you see below, is approx. three evenings work.......maybe it isn't all that much.  I'm still proud.


I had put this project aside, as I had other deadlines, and I had to work on January's challenge too.  

While I worked on January's challenge, toward the end I would think about what the next number would be.  I thought of a lot of my UFOs, in turn, and what I would have to do to finish each of them, but the one I didn't think about was this one.  I don't know why, but I never even thought that this one may get chosen next.

When I opened up Facebook and saw that they announced the February's number was #9, I was kind of nervous to look at what my #9 was.  Well, imagine my surprise when I saw it was this one.

My original plans for this morning, of getting my blood work done and running around, getting errands done before work, didn't work out, as my car wouldn't start, so on to plan B.  But.....I didn't have a plan B.......so I figured, that was a good enough excuses to sit and stitch. Greatest stress reliever!

This is the progress I made in the one sitting.  I finished most of the branches for the trees in the corner.  It is looking great.  It is amazing the transformation.


Yesterday, when I first noticed the announcement, I pulled out my project box and took out the pieces.  During my breaks and my lunch from working my full time job, I assembled three main blocks and two flying geese blocks.  The picture below, shows what I have on my design.


Four of the inner sashings have been rouge cut, the blocks have been added and the panels that I traced, but didn't start yet are on the wall too.  As I work on things, they will get added to the wall, or assembled to each other.

The blocks themselves won't take long at all, but the handwork........well.......that is going to take some time.  A lot of time.  Handwork is always slow going.  I am not worried about getting this quilt done in February.  I don't want to rush it and forget about enjoying the process along the way.  So long as I get some progress on this, I will be happy.

I have a busy schedule for February..........we'll have to see just how far I can get.
Tuesday, 30 January 2018

Finished quilting a quilt for the Guild, a charity quilt

Yesterday, I finished the label for my Christmas pineapple blossom quilt and today I am back to tacking down the binding, by hand.  Rather than show you boring pictures if that, I thought I would share this finish from a couple of weeks ago.

This is a quilt, a member of the Halton Hill Quilting Guild made and I quilted it.  It's colourful and will cheer up anyone who is lucky enough to receive it.  The colours are a bit brighter than what you see in the pictures.  The blocks are basically the same with four blocks of yellow, four of green, four of blue and four of red, sewn together in a strip and attached to each other.

The strips are not always in the same placement and each colour has different fabrics.  A true scrappy quilt.  This will help clear out some of the scraps.  Once the blocks were made, the blocks were sashed with a black fabric with grey polka-dots.


If you look closely in the picture above, I flipped the backing up, so you could see the cute backing they provided for the quilt.  My daughter and I love the cheerfulness of the backing.  It matches well with the rainbow of colours on the front.

This next picture is of one block, so you could see the individual squares that make up the block.  If memory serves me, the squares finished at 2 1/2". 


Here is a closer look at the individual units that make up the blocks.  You can see the quilting a bit better.


I enjoyed quilting this quilt.  The patterns I used are becoming second nature to me.  It's just a simple design, but looks lovely on small squares.

Sunday, 28 January 2018

January's BOM by Whirls n Swirls are done

Last week I joined a BOM by Whirls n Swirls to practice and expand on my quilting skills.  I bunch of people will be in this group, in a different forum than Facebook.  The BOM pays more attention to the quilting options than to making the blocks themselves.

I figure I am ok to write about the blocks themselves, however the quilting part will be for the forum only.  As I said in my previous post, I have decided to do all three options.  Now that I have them made, I can practice quilting each of them differently.

This fist block is for the traditional way of quilting, with traditional designs and motifs.


This second block will represent my modern style of quilting designs.


And lastly, this third option is to be the free hand style of quilting.


I have viewed the videos produced by Tracey Russell of Whirls n Swirls, and I have been practicing the different styles on paper.  I am ready and really wanting to start quilting them, but this weekend was already packed with all sorts of things.  I should be able to work on it next weekend.  The next BOM will be posted and I will have them to make too.

Saturday, I made some more samples, from newer patterns in different scales, I loaded the Xmas pineapple blossom quilt on the longarm to quilt, as this needs to be finished prior to February 1st.  This quilt is part of the UFO challenge I joined, with American Patchwork & Quilting.  I have only three days left to get this quilt done.

I now have the quilting done.  It only took me the good part of the afternoon/evening until 2:00 am this morning................and lack of sufficient sleep has made it slow going today. 

Today, I trimmed the quilt, made some bias striped binding and sewed it on by machine, to the top.  Now I am in the process of tacking down the binding by hand, to the backside.  So far, I managed to get almost one side done.  Handwork takes a while, though I have my label just about done, so there is still a chance I will make the deadline.  Three sides of binding on a queen sized quilt and two lines on the label, all to be done by hand.......may still make it.  Optimism and positive thinking will help my determination!

Wednesday, 24 January 2018

More progress on my Xmas pineapple blossom

Here you have it!!!  I finished the top of my Xmas pineapple blossom quilt.  This is the #12 for the American Patchwork & Quilting UFO challenge.  

I started off the month with only a hand full of blocks and really set my mind to the task of meeting the goal.  This has got to be the fastest quilt top I've made.  This is a version of Bonnie Hunter's pineapple blossom quilt that she has, as a free pattern on her blog.


I changed mine up a bit, as I needed to use up smaller scraps and I wanted to use up stuff that was of various sizes of strips and chunks.  So, I drafted up a block on paper, to paper piece mine.  The strips finish at 1" and the blocks finish at 7 1/2" square, as the middle square is 1 1/2" instead of 1" like the strips.  In my layout I also added sashing with cornerstones.

This next picture is a close up of a corner.  I decided to use a red peek-a-boo border for this quilt too, just like my Canadian Northwind quilt.  Everything I had in Christmas fabric went into this, so long as it was not considered a neutral.


Here is a closer view of a portion of the centre.  If you enlarge the picture, you will see all the variety that there is in this one.  This was definitely a good user of scraps.


Now I am hoping to have time this weekend to quilt it.  Time is running out to finish this quilt for this month.  In the meantime, I am working on the label, in hopes of having it done to put on while I bind it.

I am so glad I joined this challenge.  I challenge myself all the time, but it is much better when you have a bunch of people doing it together and rooting each other on.  Take care, and don't forget to have fun while doing it.

Monday, 22 January 2018

Great meeting of the Longarm Quilter's group

Yesterday, Sunday was our monthly meeting of the South-Central Ontario Stitchers group.  It was another great meeting.  Comradery amongst the group is good with everyone eager to learn and meet others in the same field.  Quilting can be isolating, as it is generally done alone, but getting together with likeminded people is nice.

Tracey from Whirls n Swirls had a short demo to teach us how to add more backing fabric to the quilt that is already loaded, without removing the quilt from the longarm machine.  This would have been great for me, last week, when I got to the bottom of my quilt and noticed I had the border still to quilt, but had run out of backing fabric.

After the meeting, I decided that I was going to join the 3 Way Block Sampler Quilt, that Tracey is offering to expand on our longarm quilting skills. 


This is the information (see above).  This is all I can show you, so if you want more information on this or want to join, go to Whirls n Swirls' website for the details.  This is an online class, so anyone can join, and for those that do not have a longarm, with the right foot you can do the quilting on your domestic machine too.  That is where I first learned to quilt, and yes you can use rulers with your domestic machine too.

Basically, Tracey is going to provide us with a block pattern each month, and she is going to give us three different ways to quilt that block.  Her categories are traditional, modern, and free hand.

Well............guess what?  

The insane person that I am, has decided to do all three.  Surprise, surprise!!  Not really.


Above is my first selection of fabrics.  These will be for the traditional option.  The first picture below will be my fabrics for the modern option.


Lastly, this next group will be for the free hand option.  All three of my choices are completely different. I've decided that if I was going to do this, it had to be from my stash.  So far so good.


I am looking forward to working on these.  There is always more to learn.  For me it is learning the different motions used for the longarm versus how I have always done it in the past, which was on my domestic machine.  I have come a long way since I got my longarm last year and continue to practice and learn.

Stay tuned for the monthly updates.