Friday, 18 January 2019

Modern version of the 3-way BOM quilt

Blogger has been acting up these past couple of days.  Wasn't able to upload pictures.  But I finally found another way to do it.  Hopefully they will get it fixed soon.  It was so much easier the other way.

I have been going though a bit of sewing/quilting withdrawal this past week.  Tax season is fast approaching here and I needed to get all my paperwork in order.  Just a few more details and I will be done.  This weekend promises to be another very busy weekend.  I have plastering to hopefully finish, and prime. There is the big cleaning to do of all the plaster dust that seems to get everywhere.  I have customer quilts to get to and numerous other maintenance/fix-ups to do too.  

BUT!!!  I really needed a fix with some time in my quilting room, with me and my fabric.  So.....I pulled out my modern version of the 3-way BOM quilt.

I had two blocks left to do for this BOM.  Here is the first one.


And here it the second one.  I like how the solids in this block make it pop.


I've chosen a black solid for the sashing and first small border.  I will follow it up with the skating dogs and cats for the last border.  

I'm not sure if I have succeeded in satisfying my quilting fix, but I am feeling a bit better. 

Tuesday, 15 January 2019

Gathering flowers quilt second two blocks

I was having a pleasant time, just mellowing out after the Christmas rush.  I finished the first two of my Gathering Flowers applique blocks and was enjoying the process of picking the colours, cutting the pieces, etc.  The slow pace was meditative.  By this point, I had decided to take the day and continue to work on these blocks.

The next block, number 3 of 20, is my version of the Primrose block, this one came from an unknown source.  I just varied up the buds at the corners, by using the 3D pleated buds.  The green stems on the background fabric were already done during the first go round.  I only have about 1" of one stem to complete, hence the thread still dangling.


For my next block, number 4 of 20, I am doing the Crossed Leaves from page 64 of Mini Dietrich's Baltimore Basics book.  This is my first draft.  I am finding this to be a bit too predictable, maybe even boring, so instead I am thinking of changing it to, the second level of leaves the lighter green and the tip leaves in a yellow instead, just like the picture in her book.  I guess I will wait to cut the new pieces later, when I am ready to assemble this block.


Doing these blocks, as I mentioned above has been meditative and fun at the same time.  So much fun, that after lunch that day, I just jumped right back into it, to work on some more.  Stay tunes for the others in a future post.

Have a great day everyone!

Monday, 14 January 2019

Gathering flowers quilt first two blocks

During the Christmas holidays, right after all the unwrapping of gifts, food and family gatherings, the kids were content doing their own thing and vegging out.  I hid away in my quilt room and did something more relaxing than my usual.  I figured there was no way I was going to finish the December's challenge quilt, so no reason to stress out about it and break my back (figure of speech), trying to do it. 

Instead, I took something out that I have been really wanting to do.  The suspense has been building to start on this one again.  It's my Gathering Flowers appliqué quilt.  It's a beginners Baltimore Album design.  

For this quilt I have numerous blocks started.  I believe more than half of them.  I stared with making stems.  Green and blue.  The green ones for the stems of flowers and the blue for baskets.  The one below was the first one I started (1 of 20).  This block with a starburst of leaves with berries is called Spreading Leaves from page 29 of Kay MacKenzie's Inspired By Tradition book.


I did a leaf at the time and realized I needed to build up to the skill level needed for needle tune appliqué.  So instead I turned to the technique of making stems.  This time around, I decided to cut out all the pieces needed for the blocks.  It may be difficult to see, but there are two shades of green to make up the leaves and three shades of pink or red for the berries.  

This block is now a grab-and-go piece.  I could take this with me on my travels and work on it during free time.  After I cut the pieces, I took the leaves that I had done off to redo.  I like them better now.  I did not take to the needle turn method, so I did them using another technique that I've learned since.

This next block with it's fancy weaved flower basket is 2 of 20.  This one is called Curved Basket from page 87 of Mini Dietrich's Baltimore Basics book.


These were the stems I was talking about above.  The stems are made in advance, like a skinny tub, that you appliqué to the background fabric.  I had this basket done the first time around and this time I cut out all the remaining pieces for the block.  It looks a bit like a mess of colour right now, because the pieces are larger than their final size.  Once I take in the 1/4" seam, they will all fit in nicely.

I especially like this block for its basket.  The appliqué is actually 3D. The stems do "weave" in and out of each other to create the basket.  I also like the curve, of the rim, that goes on the basket at the top.  Another unique thing about this block is the 3D flower buds.  On the square paper holding my cut pieces, the bottom two flowers are the buds.  They are folded fabric, that make up the buds.  It will be cute when it is completed.

So, this is where it sits.  I won't be working on these anytime soon, but I did enjoy playing with the fabric and colouring in the picture using fabric.  

I did put this quilt on my UFO challenge list for 2019.  I get excited just thinking about when this quilt's number may be picked.  When American Patchworks & Quilting pick the number 4 for their UFO challenge, you can bet I will be shouting for joy.  

I know I will not get this done in a month, but I will be able to work on it guilt free and take it, that little bit further.  

Sunday, 13 January 2019

Finished quilting my snowflake wall hanging

Last year for Christmas my daughter gave me this wall hanging top.  She made it all on her own, without me even knowing about it.  These are hexagons that she lovingly sewed by hand.  She sewed them into this design of her own. Though she did raid my stash to make it....lol.

I am in the process of making seasonal wall hangings for the hanger/shelf in my quilting room.  The year before giving me this one, she made me one that I put up in May, about a Mother's love.  This one is going to be for January.


It took me a whole year to get up the nerve to quilt it.  She did such a fabulous job of assembling this, all by hand, with tiny tiny stitches, that I was afraid to ruin it.  As you can see, I finally did it.  I worked on it during my Christmas holidays.  I wanted to have it ready in time for this January.  The quilting was quite intense, as these little hexagons are only 1" across from flat side to flat side.  Don't look too closely, it's not perfect, but now it's done and I can enjoy it on my wall.


Doesn't it look gorgeous!  She did this for ME!  I am still blown over by the fact that she did this for me and that she designed it all on her own.  Did I tell you, that this is the first time she has worked with and finished something with hexagons?  First time and this baby lays flat!  Amazing!

Loving it on my wall.  Thank you, Bébé!

Saturday, 12 January 2019

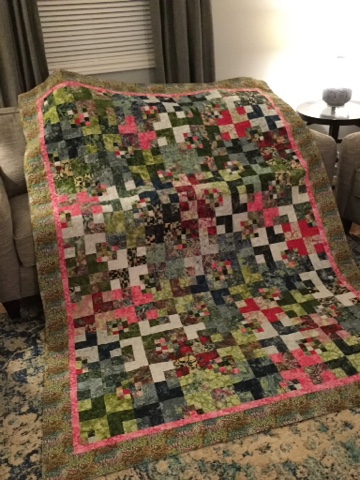
Batik pinks and greens quilt

My customer, Janet, was a very busy lady.  This was the third quilt she had for me to quilt.  Unlike the last two mentioned in yesterday's blog post, this one I did get pictures of.  The only reason I remembered, was that I was on my way to the guild meeting to deliver the quilt, and when I stopped to pick up my mom, I remember that I didn't get the pictures.

This quilt is beautiful.  It's made of batiks in different shades of pink, green and some blues.  I don't know the name of the block, but I like how it distributes the colours.  The colours in the picture are a bit muted, as the photo was taken in the evening with only the lamp lights on.  The true colours are more cheerful but not loud.


When I look at this quilt, I think of a pretty garden with flowers all in bloom.  Maybe that is why Janet chose the border fabric that she did.  This large quilt is going to one of her teen aged granddaughters.

For the backing fabric, Janet, used solid navy blue, pieced around and between the bright fussy cut hummingbird blocks.  When I initially saw the "solid dark" fabric, my brain went into overdrive trying to figure out how I was going to quilt this, and more importantly with what colour thread.

With a solid coloured backing and with a very dark fabric, a lot darker than the top, I kept thinking that everything is going to show.  This had to be done with precision. Yikes! Even after the length of time I have been quilting, I still get nervous with a solid coloured backing.


In the end, I chose to go with a dark grey thread.  My main concern was the hummingbird blocks.  I didn't want to quilt overtop of the hummingbirds and distort the pictures.  As I used Glide thread, even though it was dark grey, it blended in well with all the colours and is almost invisible.

But look what it did to the navy blue!  It added gorgeous texture of flowers, that creates a backdrop for the flying hummingbirds.  The grey is dark, so it only shows up enough that you can see the pattern, but it does not distract from the backing as a whole.  


The front of the quilt is beautiful, and the backing can also hold up it's own.  To me, this quilt can be considered a reversable.  Pretty on both sides.

Another great quilt!!!  Well done Janet!

Friday, 11 January 2019

Brown rail fence variation

This was another quilt I finished back in November I believe.  I am so bummed that I forgot to take proper pictures of it.  This is a customer quilt.  Her name is Janet.

Janet did a lovely job with this top.  It's a rail fence variation that was made with different shades of brown.  The variation part is that one of the rails, in each block, is pieced squares the full length and width of a single rail.  Janet made this large lap size quilt for her son, for his couch.


I'll see if later I can get her to send proper pictures of the quilt for me.  She had given me another quilt assembled in a bar quilt form/style, done up in grey oriental type fabrics, that she made for her daughter, however I did not get any photos of that one.  That was when time was starting to slip away.

The grey lap quilt was also gorgeous and had a modern flavour to it.  It was made to highlight large print fabrics, so you didn't have to cut it up small and the prints are what really made the quilt standout. There was also a thin 1" off-white sashing between the vertical rows to separate the prints.

I am sure both her son and her daughter will love their quilts.

Thursday, 10 January 2019

Batik coin box quilt

Since October, I have many finishes, for myself and for some clients.  The problem is, I forgot to take pictures of all of them.  I do have some, which I will share with you in the next few post.

This is the first one.  This is a customer quilt.  Her name is Teresa.  I call this quilt coin box, as I believe that is what the block is called.  It's pretty up close where you can really see the different shades of colour that you get with batiks.  Unfortunately I forgot to take close up pictures.


Teresa tells me that she won the jelly roll that was used to make this quilt and she only had to buy the light batiks, the orange border and the last border.  This quilt is queen size and to please her hubby, she decided to use a wool batting to keep snug and warm.

Very nice quilt Teresa, great job!